Build Free Loop
Prepare to Sign
This page is not stand-alone. You typically get here after choosing to Sign Manually after a successful download using the Build Select script.
Normally this option is chosen by people building the app with the Free option or if you want to build to a simulator on your computer.
If you have a paid developer account and are building Loop 3, you are far better off choosing to configure the permanent override file with your Apple Developer ID. Refer to Sign Targets.
The instructions found on this page are for the first build. With the Free version, you need to build every week. Refer to Build Again with this Download.
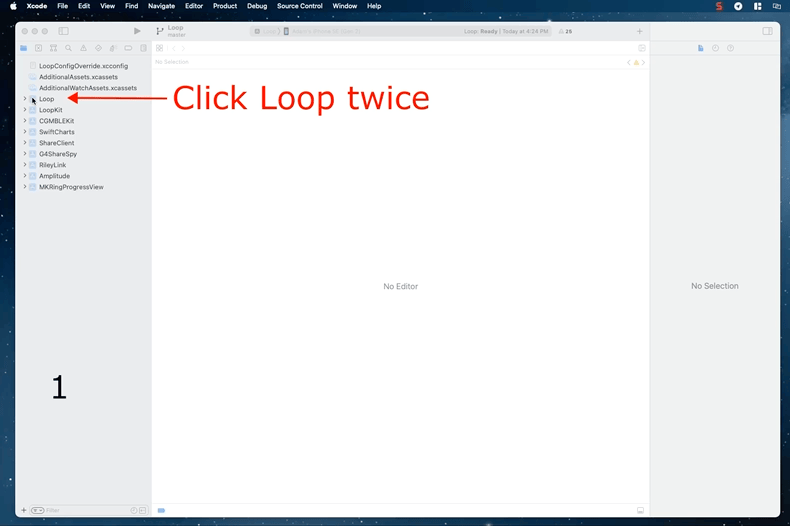
Select the Loop Folder
Don't touch that button!
You will be told exactly where on each screen you should click. Please only click in the designated places.
Follow the directions and compare your Xcode screen to the graphics as you walk through the steps.
As shown in the GIF below:
- Frame 1: This is what the Xcode screen looks the very first time it is opened after a fresh download
- You need to click on the indicated Loop folder icon two times
- Frame 2: After the 2 clicks, the middle pane of the Xcode window should be similar (except you will see LoopWorkspace, not Loop)
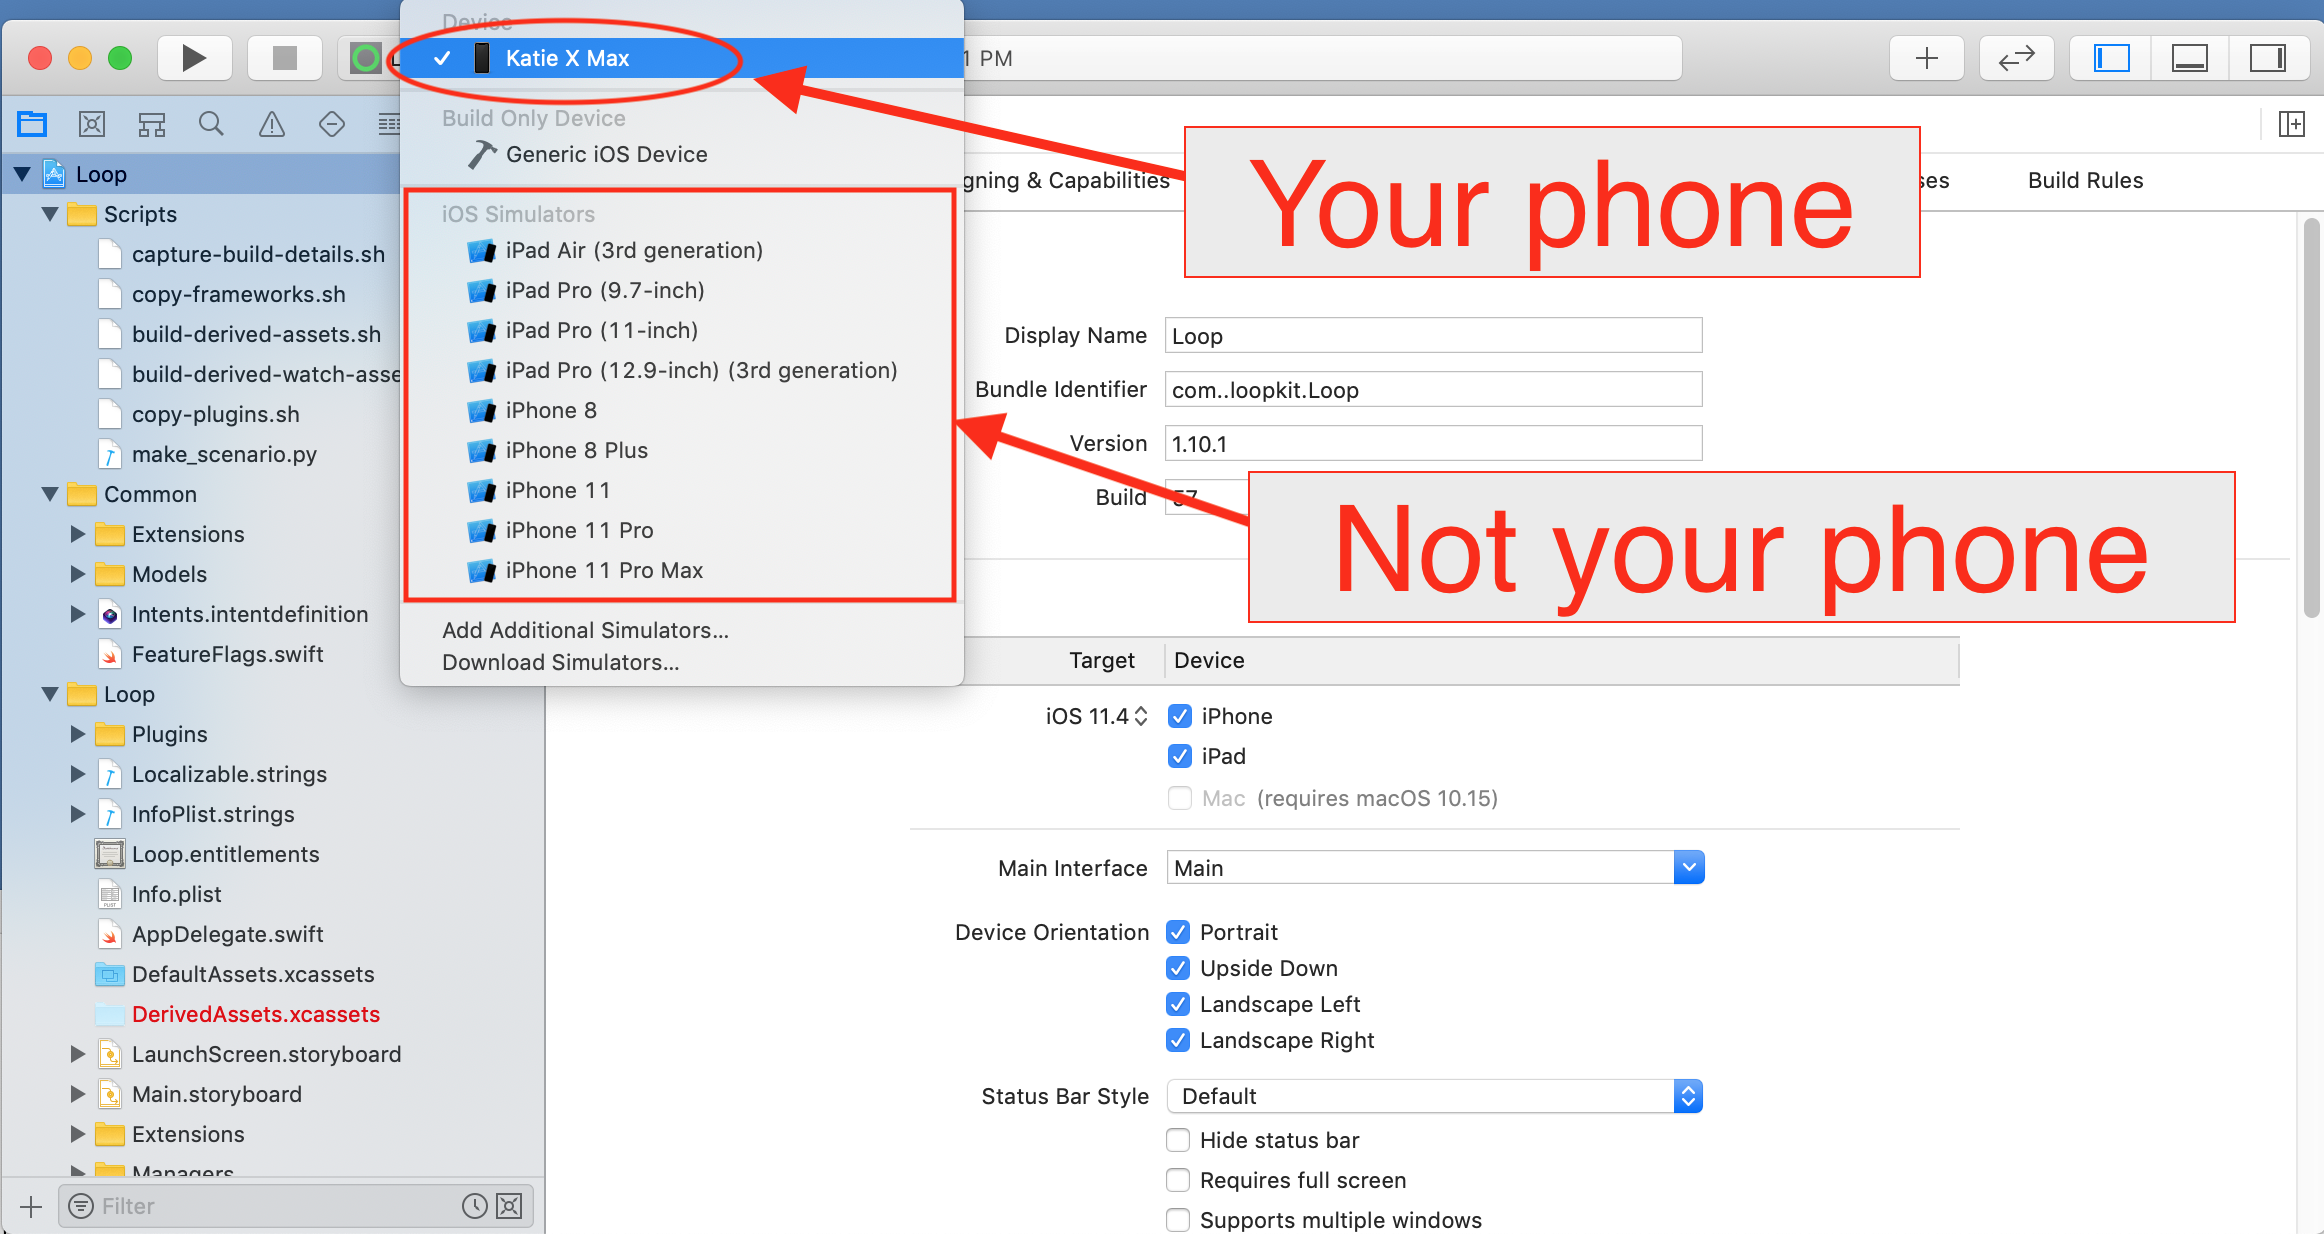
Select Your Phone
Select your phone in the dropdown in Xcode. Be sure to select your actual phone - not a phone simulator.
- If this is the First Time your phone or watch has been connected to Xcode, you will need to tell the phone and watch to "Trust this Computer".
I don't see my phone
- If you don't see your phone in the Devices section, unplug and plug in again
- Still don't see your phone - reboot the phone - and if that doesn't work - reboot the computer
- Still don't see your phone - try a different cable or USB slot
Build to a Simulator
Skip this section if building to a phone and proceed to Select Signing & Capabilities Tab.
If you want to build to a simulator, follow the directions in this section and skip the rest of this page.
- Simply choose one of the iOS Simulators instead of a phone and build to it
- The iOS simulator you choose does not need to be the same model as your phone
- With a simulator, you do not need to sign targets:
- After a successful build, a simulated phone will appear on your computer and you can interact with the app on that simulated phone
- Follow this link to Start Build
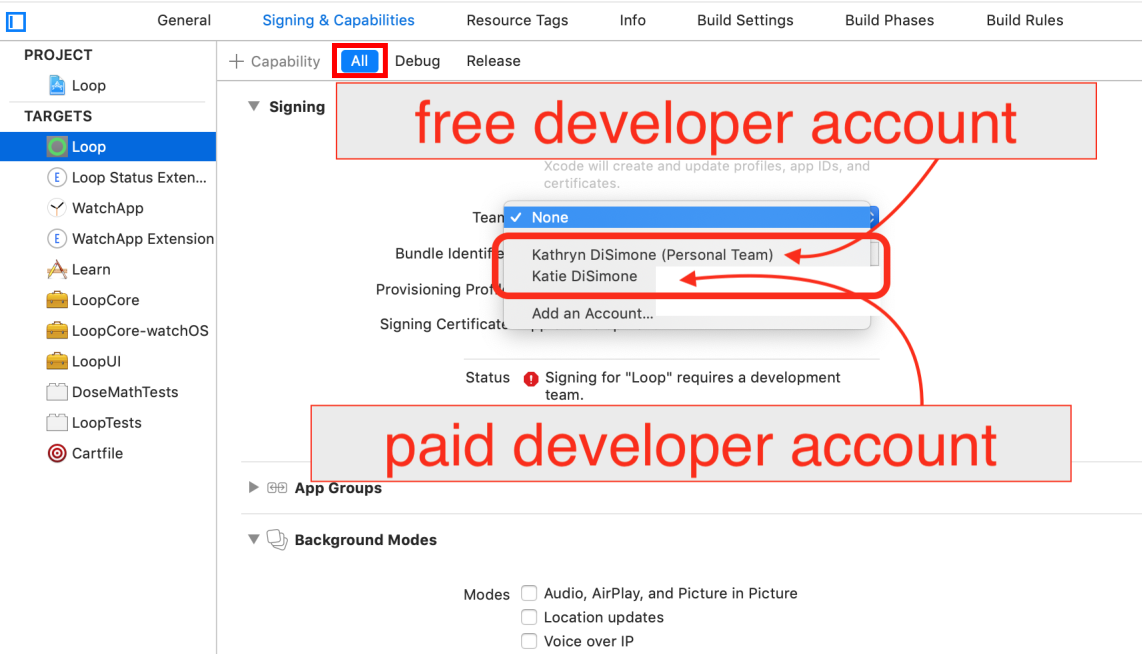
Select Signing & Capabilities Tab
What does Signing Targets Mean?
"Signing Targets" in Xcode identifies who built the app. You cannot deploy an app to a phone without signing each target associated with that app.
The graphic below indicates in red the three places you need to click in order to begin signing targets.
- First, click on the tab labeled
Signing & Capabilities - Second, click on the icon labeled
Loopunder the wordTARGETS - Third, click on the dropdown menu (red circle) by the word
Team
Click Only where Instructed
- Make sure
All, indicated by dashed blue oval, is selected- If
DebugorReleaseis accidentally tapped, you will not be able to build
- If
- Make sure
Automatically manage signing, indicated by dashed blue rectangle, is checked

Sign the Targets
It is time to Sign the Targets with your Apple ID.
If you chose to sign manually but have a paid account, you can skip the Free Account steps below.
You will be building multiple targets to make a complete app and must sign each one. There are 6 targets to sign.
Start with the Loop target, the first one on the target list. Choose your Apple ID.
Free Account
This section is required if you are using the free account.
Some features of Loop are not available with the Free option, so as you sign, you will need to remove features that are not supported.
These directions are for Xcode 26.2. They may vary based on Xcode version.
- You must remove unsupported capabilities from 2 targets, this is best done as you sign each target. The items you must delete (using the trashcan) or edit by adjusting checked boxes are listed in order from top to bottom:
- Loop Target:
- HealthKit DO NOT DELETE
- uncheck the Clinical Health Records if it is checked;
- finish with the Healthkit Background Delivery checked - you may need to toggle it off and then back on to get the signing to work
- NFC Tag Reading capabilities (delete), (NFC Scan is OK)
- Push Notifications (delete)
- Siri (delete)
- Time Sensitive Notifications (delete)
- HealthKit DO NOT DELETE
- Watch App Extension Target:
- HealthKit DO NOT DELETE
- uncheck the Clinical Health Records if it is checked
- check the Healthkit Background Delivery
- Siri (delete)
- HealthKit DO NOT DELETE
- Loop Target:
- Add the keyword
SIRI_DISABLEDto the LoopConfigOverride.xcconfig file- Click on the filename in the left pane of Xcode and view it in the Xcode editor
- Examine the file and find the line that starts with
SWIFT_ACTIVE_COMPILATION_CONDITIONS = $(inherited) - Insert the new keyword (separated by a space) anywhere after
$(inherited)before the end of the line - When done, that line should be similar to:
SWIFT_ACTIVE_COMPILATION_CONDITIONS = $(inherited) EXPERIMENTAL_FEATURES_ENABLED SIMULATORS_ENABLED ALLOW_ALGORITHM_EXPERIMENTS DEBUG_FEATURES_ENABLED SIRI_DISABLED
Details about removing unsupported capabilities:
- You must disable some capabilities to enable building the Free app
- If the target you are signing uses a capability that required a paid account, an error message will appear when you select (personal team) for that target
- Carefully follow the bullet list above for what needs to be modified - do not delete too many items
- The Xcode error message starts with "Cannot create . . ." with a list of all the attributes not supported.
- Scroll down and click on the little trash can icon next to each unsupported attribute
- Do NOT delete the HealthKit completely - only modify the check boxes if required
- Scroll up and both the "Cannot create . . ." and "No profiles for . . ." error messages are gone
- You are done with this target
- Proceed to the next target
End of Free Account Steps
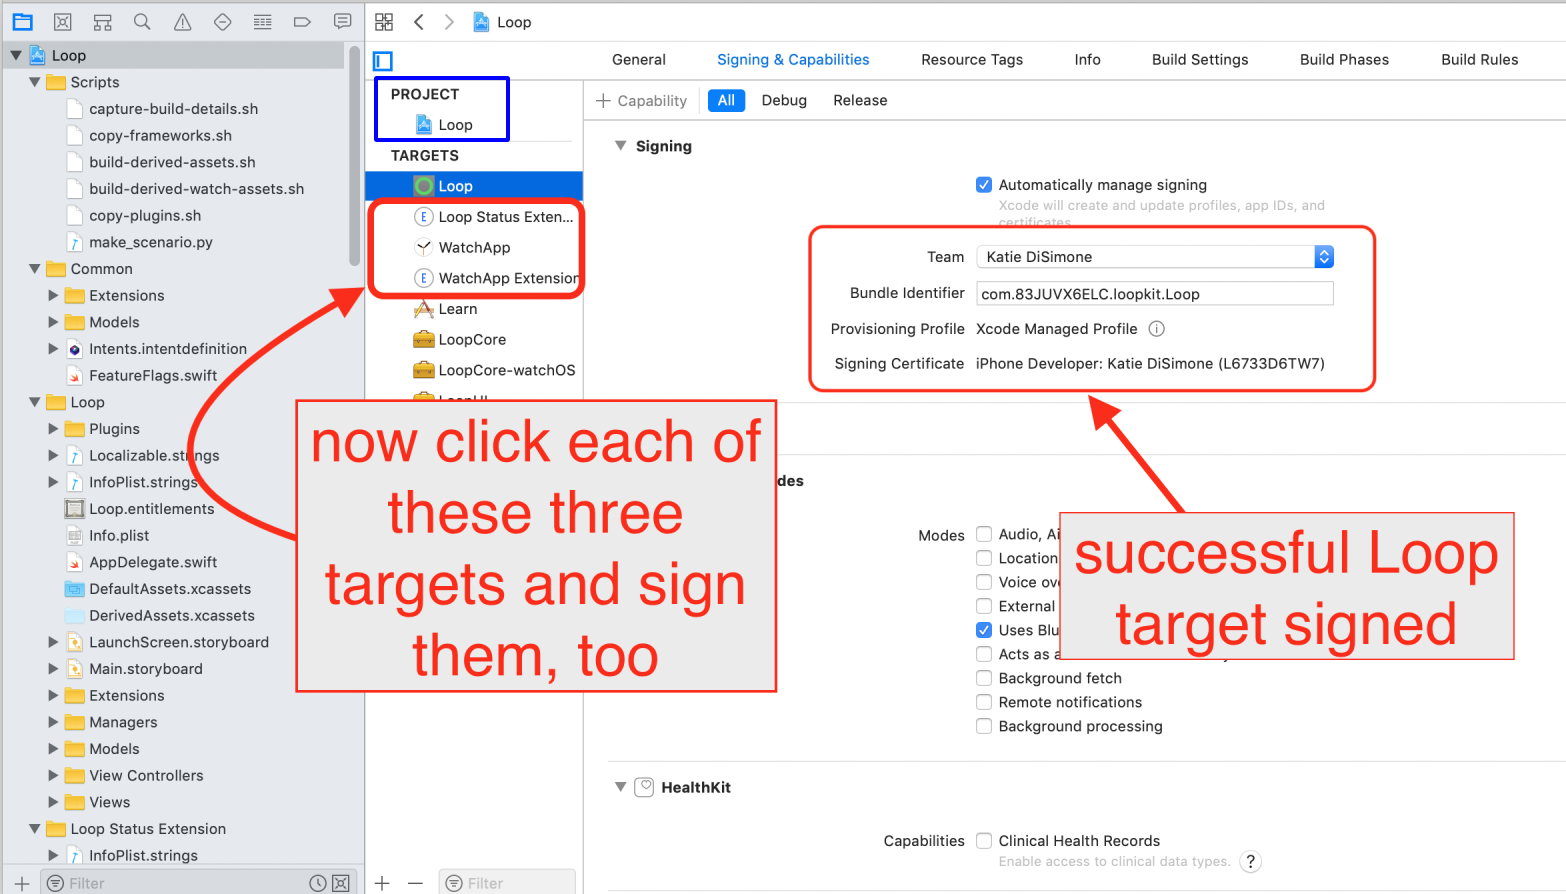
Click on each of the three remaining targets shown in the red box below, and repeat the signing steps by choosing the same team name as you selected in the first target. The targets that must be signed prior to building are Loop, Loop Status Extension, Watch App, WatchApp Extension, Loop Widget Extension and Loop Intent Extension.
The graphic below is from an older version of
Loop. You must sign all 6 targets listed above.
Signing Complete
Now that you have signed your app, you will be able to build following these directions: Start Build. If this is your first free build on this phone, you will need to build once, then "Trust the Free Account" and then build a second time. This is only for the first build. Subsequent builds on that phone are already trusted.
Trust the Free Account
The first time you build the free app, you will be told Xcode cannot install on the phone because the Free Account name is not trusted.
The phone will also show a message stating Untrusted Developer.
Once you see that error message, go into the phone and follow these steps:
- Select iPhone Settings
- Select General
- Select VPN & Device Management
- At the bottom of the screen, tap on the free developer email address
- On the next screen, tap on Trust "free developer email address"
- Tap on "Allow"
Return to Xcode and build again.