Remote Configuration
Page Summary
Save Your Important Nightscout Information
There is some important information you need to save when using Nightscout, especially for Remote Control of a Looper's phone. In addition to the URL and API_SECRET, you need 3 or 4 additional variables (config-vars) that you add to your Nightscout configuration.
- Decide where you want your Nightscout information saved and create a special folder
- Open a text-only editor (do not use a Smart Editor, those might change capitalization or formating and ruin some of the
config-vars)- Create a blank Nightscout Reference file using the text-only editor
- Tap on the copy icon below to copy the template and paste it into your blank file
- Save the file
- As you move through the steps below to configure Nightscout for remote commands, fill in the file
MyNightscoutReferenceFile.txt

## This file updated on: DD MMM YYYY

## Important Information for Remote Commands with Nightscout

You will want to add information specific to your Nightscout.
This will be different depending on whether you build it yourself or pay a vendor.

PLACEHOLDER FOR YOUR SPECIFIC INFO, e.g., vendor, username

The URL will always start with https://

https://your-nightscout-site

API_SECRET

choose-something-hard-to-guess

* must contain at least 12 characters and is case-sensitive
* hint: don’t make it too long, best to use letters and numbers,
  best to avoid special characters

If you also use Browser Build method, you need to be careful not to mix
up your keys.
The APNS key for Nightscout is an Apple Push Notification Key.
It may look like the FASTLANE_KEY used for Browser Build,
but it is completely different.
You need both (if using remote features). Do NOT get them mixed up.

LOOP_APNS_KEY
<looks like this - include the entire key>
-----BEGIN PRIVATE KEY-----
AAAAAAAAAAAAAAAAAAAAAAAAAAAAAAAAAAAAAAAAAAAAAAAAAAAAAAAAAAAAAAAA
AAAAAAAAAAAAAAAAAAAAAAAAAAAAAAAAAAAAAAAAAAAAAAAAAAAAAAAAAAAAAAAA
AAAAAAAAAAAAAAAAAAAAAAAAAAAAAAAAAAAAAAAAAAAAAAAAAAAAAAAAAAAAAAAA
AAAAAAAA
-----END PRIVATE KEY-----

LOOP_APNS_KEY_ID
<looks like this>
AAAAAAAAAA

LOOP_DEVELOPER_TEAM_ID
This is the same as the TEAMID used as a browser build Secret.
<looks like this>
AAAAAAAAAA

LOOP_PUSH_SERVER_ENVIRONMENT is used only if you use TestFlight (Browser Build)
as a build method; or use Xcode but then distribute via TestFlight.

If you build from Mac-Xcode directly to a phone, do not include this config-var

LOOP_PUSH_SERVER_ENVIRONMENT = production
Set Up Remote for Nightscout
You can use the Nightscout site to remotely set and cancel override presets remotely in the Loop app.
With Loop 3, you can also send remote commands to add carbs and command a bolus. Remote bolus/carb commands have a minimum requirement of Nightscout 14.2.6. If your Looper's Nightscout version does not meet that minimum requirement, remote commands might be accepted, but the time for the commands is always the current time. In other words, Carbs in the Past or Future might be accepted, but would be entered at the current time on the Loop phone.
After you complete the configuration, read the entire Remote Commands page - pay attention to the warnings and caveats. Test this while your Looper is sitting next to you so you can watch their phone.
Remote Nightscout Interface Caveats
- Must use a paid Apple Developer account to build Loop
- Apple Push Notifications (APN) service is not available with a Free account
- When you build Loop, the required APN information is tied to your Apple Developer account
- You add your APN information to your Looper's Nightscout site
- If you support multiple Looper's, you add the same APN variables to each of their Nightscout sites
- There are many choices for building your own or paying someone to build a Nightscout site
- The directions for only one of the options is documented on this page
- Use that as a guide for your site
- Nightscout Docs: Comparison Table
- Warning: examine the
Loop remote carbs/bolusrow: subscription refers to a monthly fee - If a green check is missing, it might just be too new for evaluation
- Warning: examine the
Paid Providers and Remote Configuration
There are several options to pay for a turn-key Nightscout service.
- In order to enable remote commanding, your Nightscout site must be configured with information associated with the Apple Developer ID used to build the Loop app
- Most Nightscout options allow you full access to your Nightscout configuration variables so you can add the required information
- Please check out Nightscout: New User for up-to-date information about your Nightscout options
- If you use the wizard, you can see more options when you select No to the question about contributing to research and development
- If you choose T1Pal and want to use remote commands, you must also purchase your Loop app from them for an additional monthly fee - contact T1Pal for details
The rest of this page assumes that you built your Loop app and you have full access to the configuration variables for your Nightscout site.
Step 1: Update the Looper's iPhone settings
For remote commands to successfully deploy to a Looper's iPhone when the phone is locked, they must have Background App Refresh enabled.
- The slider in
iPhone -> Settings -> General -> Background App Refresh -> Loopmust be enabled
Consequence if Looper's phone is not configured correctly:
- If Background app refresh is not enabled, the remote overrides might only enact if the Loop app is open and the phone is unlocked
Keep Notifications Turned on for Looper's Phone
Typically, the Looper's phone has Notifications enabled for Loop. In fact, if they don't, a red warning bar is prominently displayed.
There may be times when you really need Loop to be quiet, so you can turn off Notifications. The remote commands still go through but the Looper does not see a notification that this happened.
Best practice is to keep Loop Notifications enabled.
Step 2: Apple Push Notifications
The step is required for the Loop app to give permissions to your Nightscout site to remotely interact with it. To enable this, you need to create a key and grant it access to the Apple Push Notification Service (APNS).
Reminder
This only works with the paid Apple Developer ID.
Apple changed the APN system
Apple changed the way APN are created. Your old ones should still work, but it they don't, create new ones and update all the places where they are used.
When creating new APN keys, you have the option for "Sandbox", "Production" or "Sandbox & Production". Be sure to choose "Sandbox & Production".
- To get started, go to the
Keyssection under Apple Developer'sCertificates, Identifiers & Profilesand login with the Apple ID associated with your developer team that you used to build the Loop app. - If not already open in your browser (compare with the below screenshot),
- Click on
Keys(located in the left-hand column). - Either click on the blue
Create a new keybutton OR the plus button () to add a new key.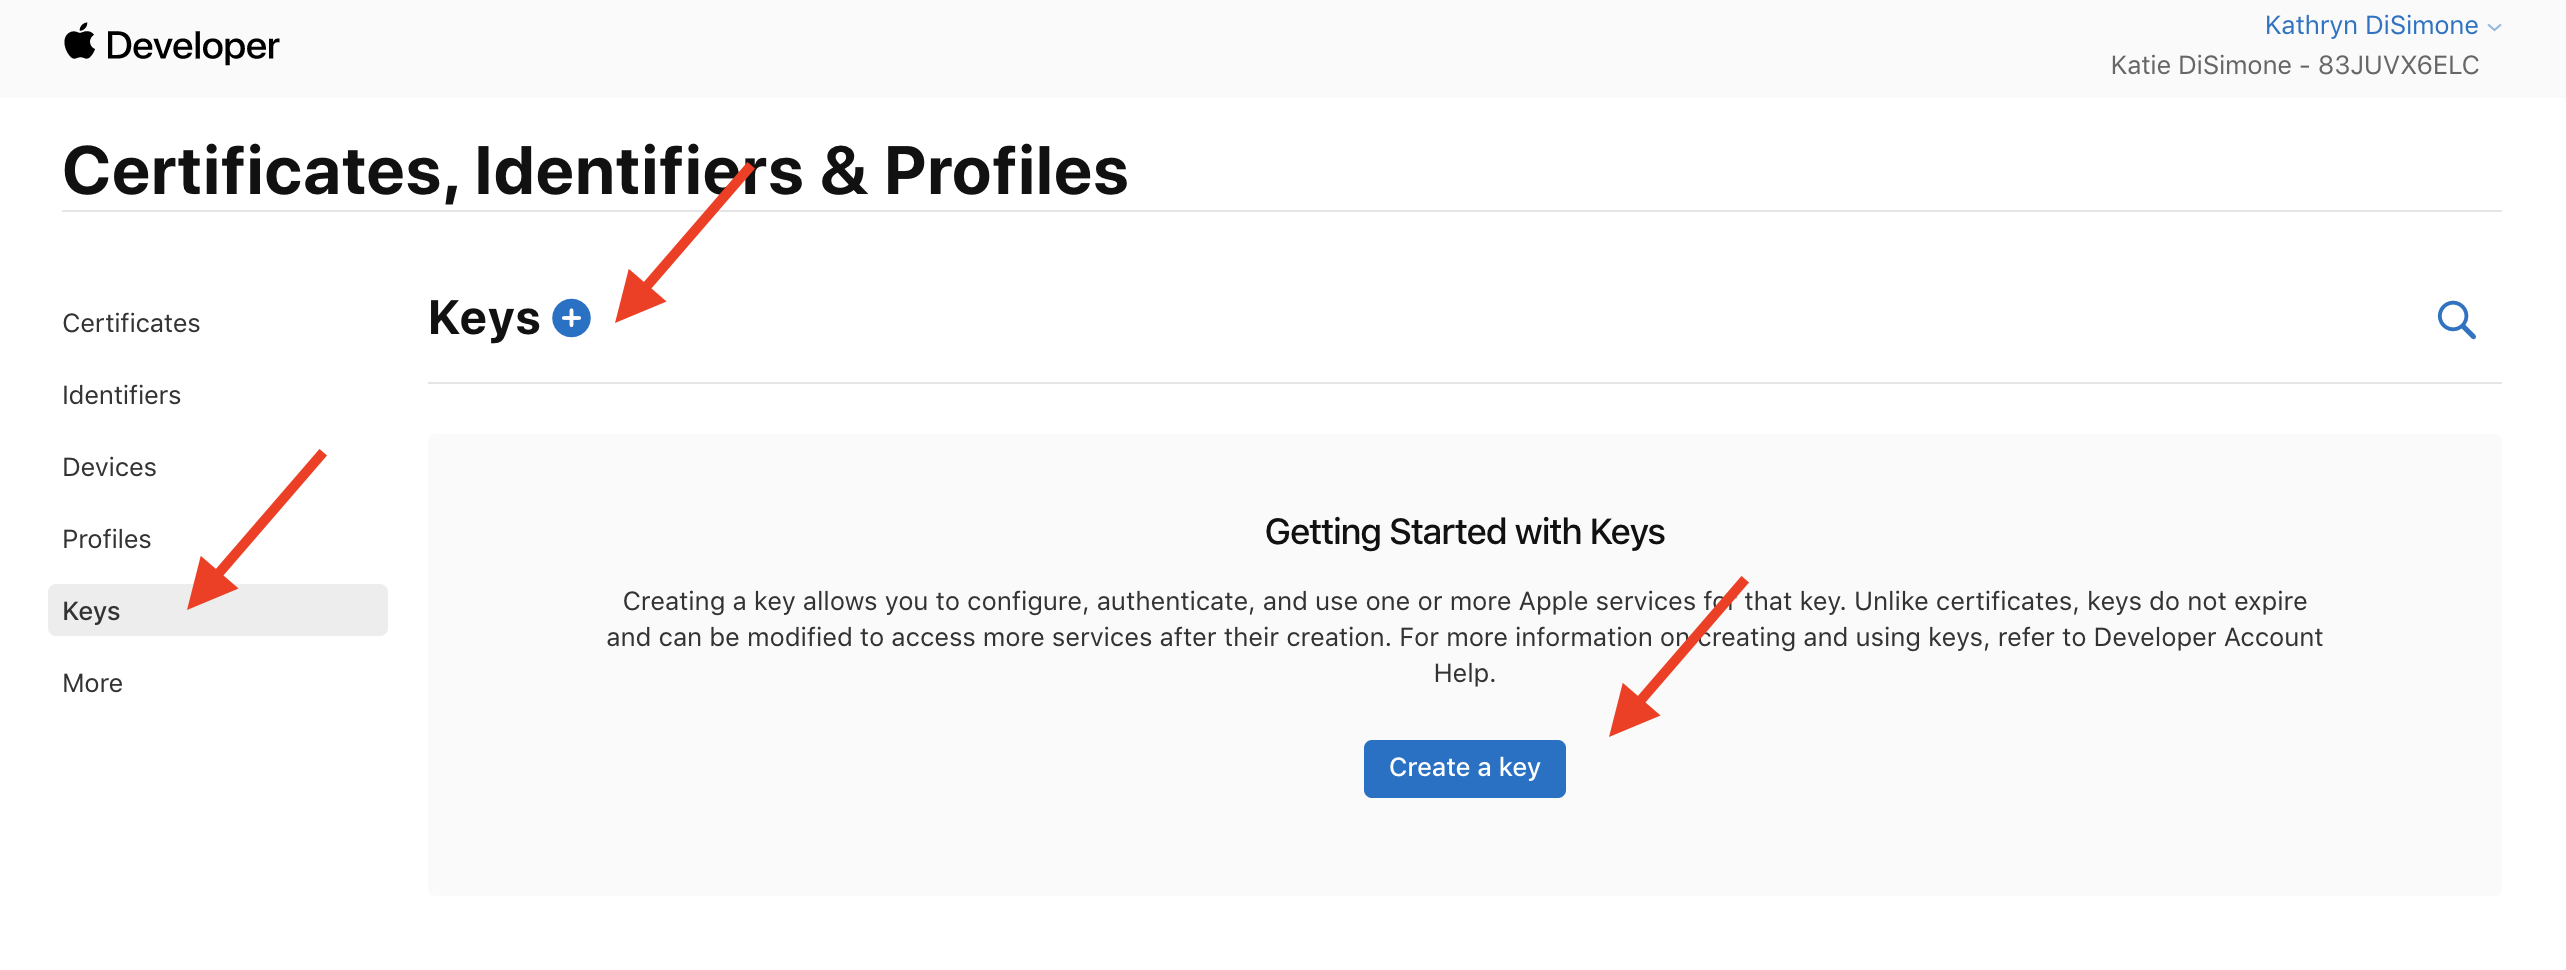
- Click on
- In the form that appears, do the following:
- Click the checkbox for enabling
Apple Push Notifications service (APNs) - Enter a name for the key such as
Nightscout(you can name it however you want, just make sure you know what the key is for by the name you choose). - Then click the
Configurebutton to the right of the name - Choose
Sandbox & Productionand thenSave - Tap on the
Continuebutton, upper right
- Click the checkbox for enabling
- In the screen that follows, click the blue
Registerbutton.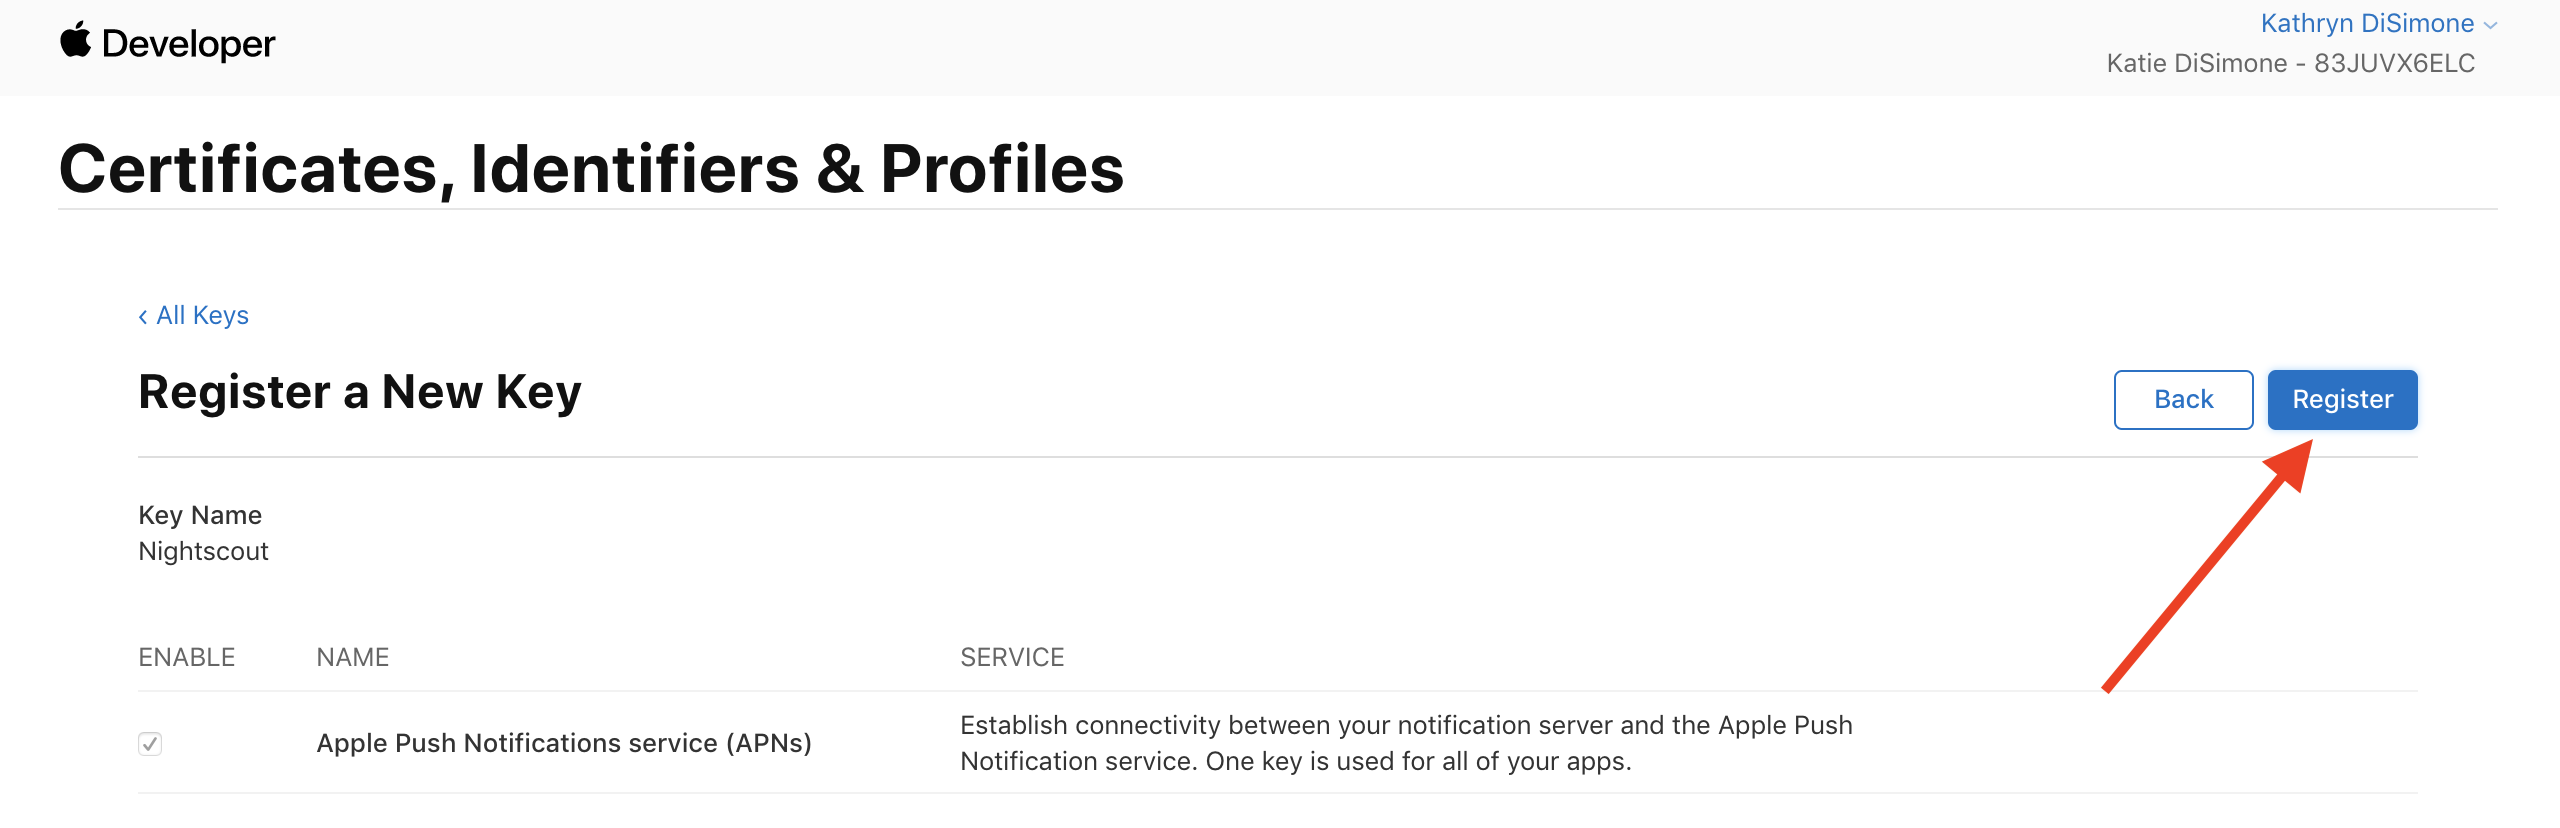
- In the screen that follows, click the blue
Downloadbutton.
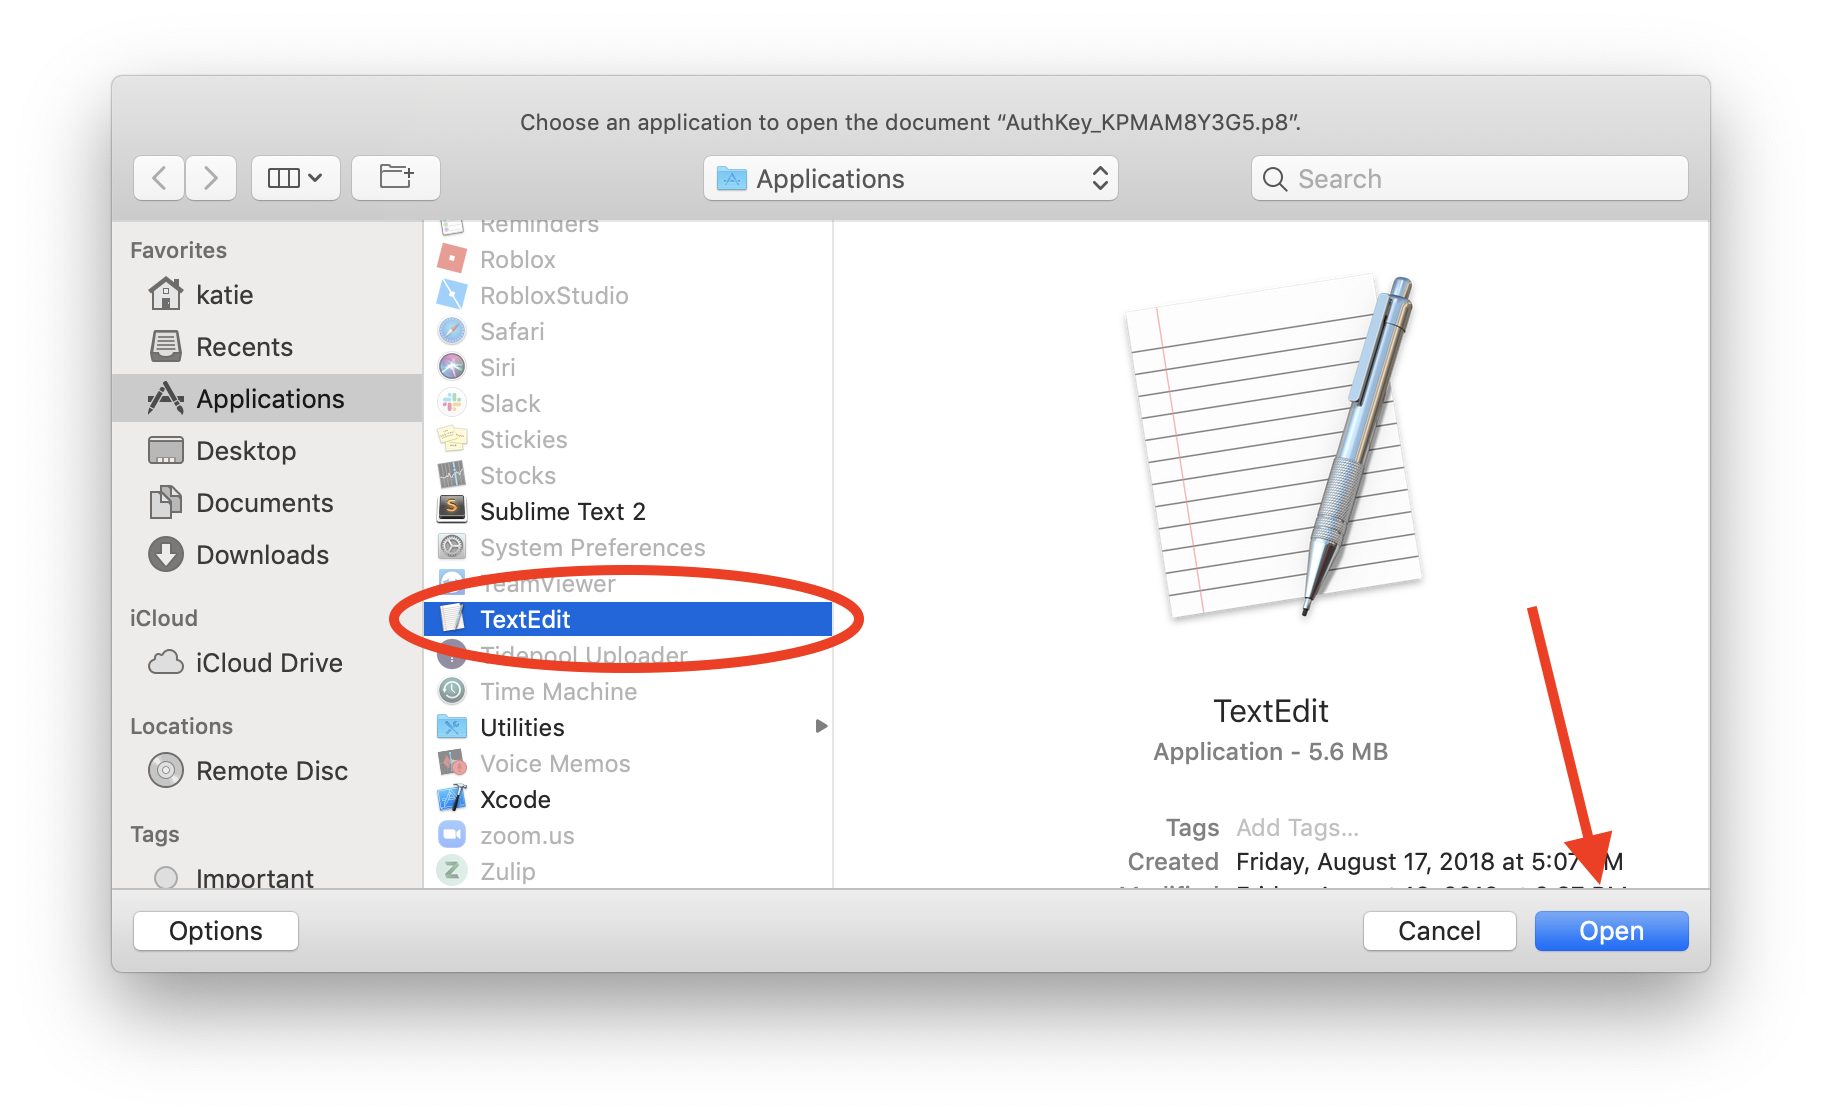
This step will download a file with a name that starts withAuthKeyand ends with.p8.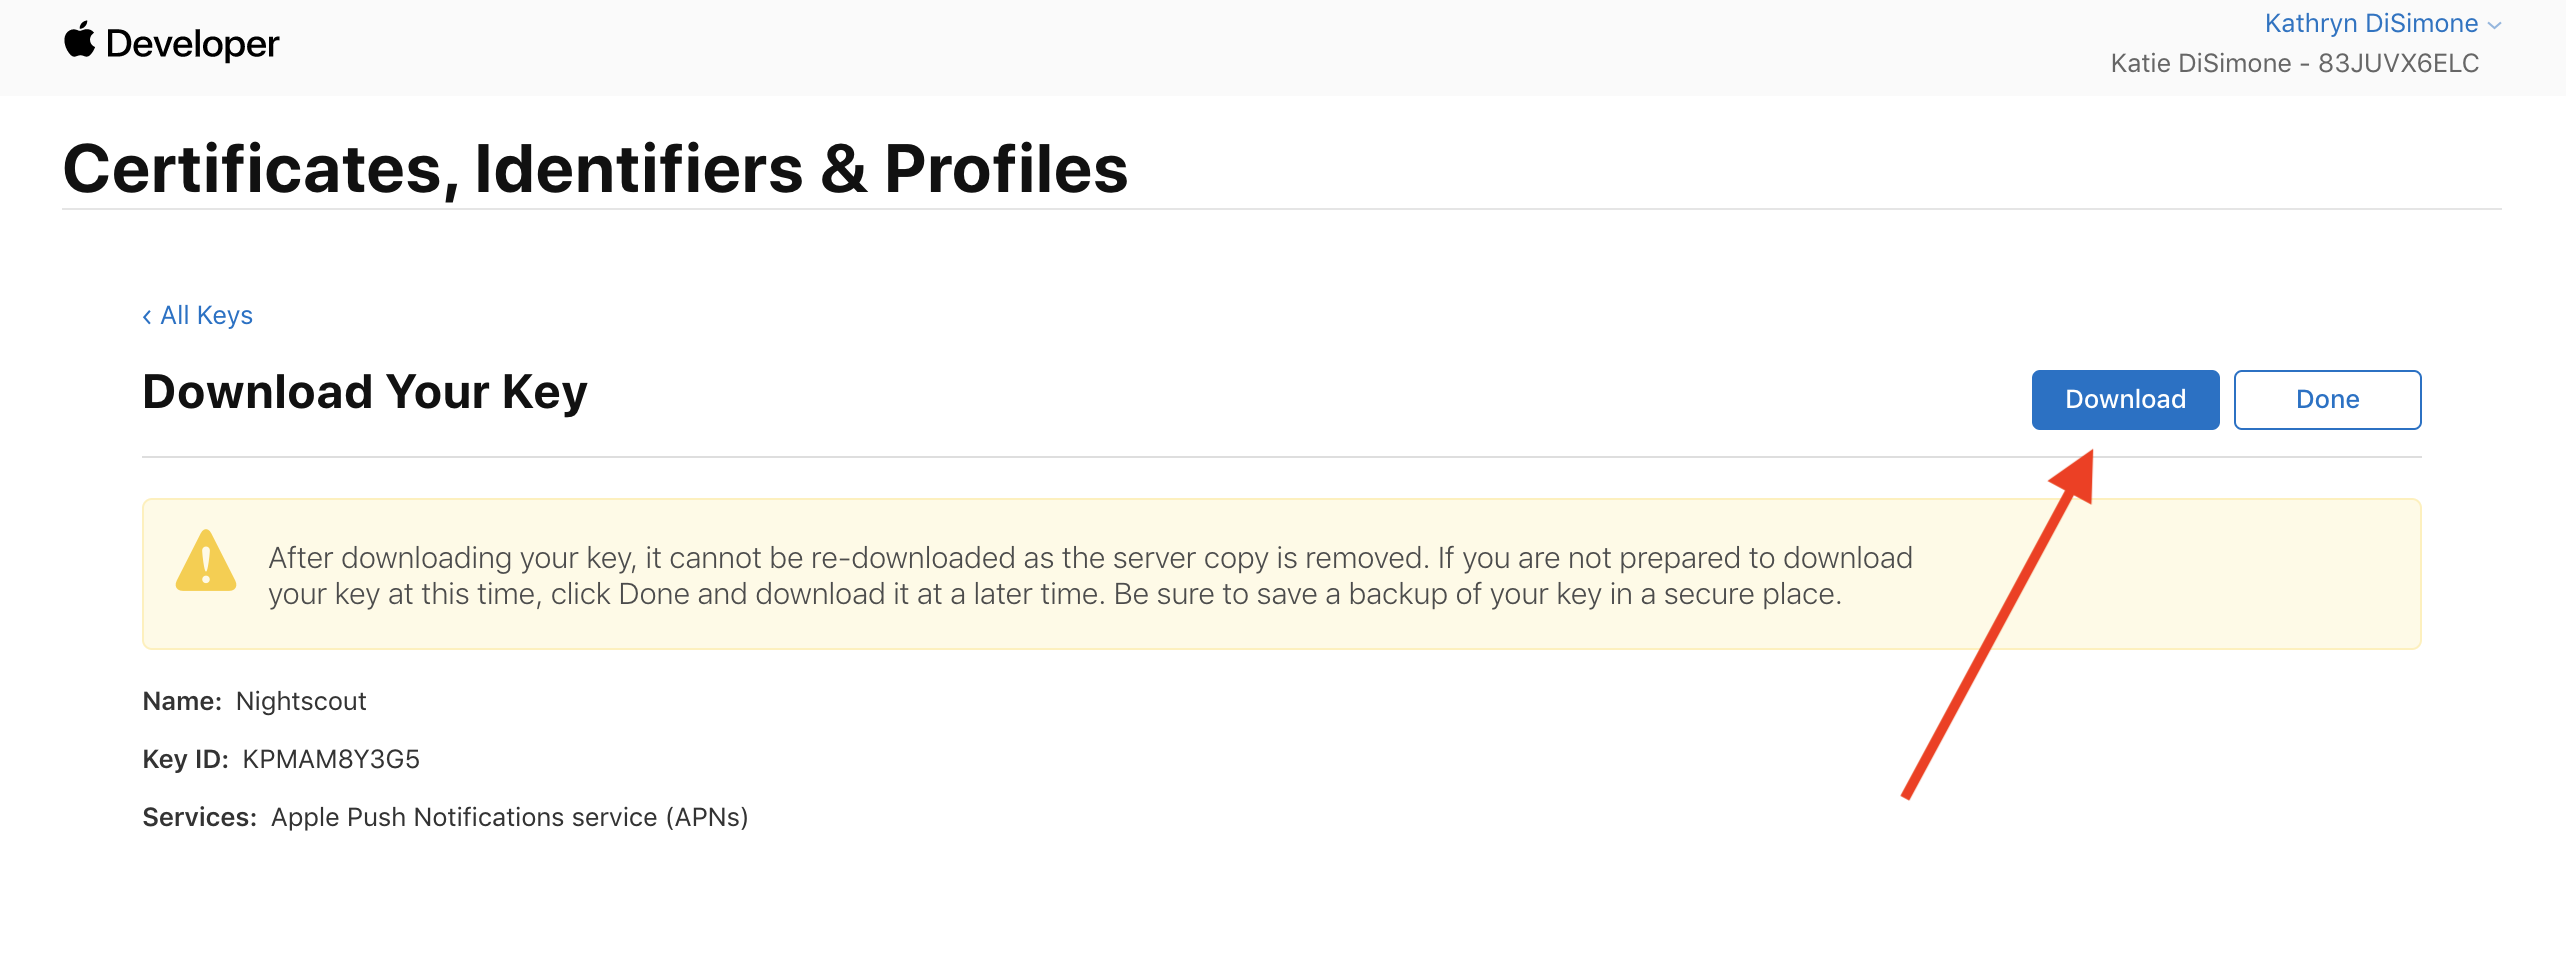
- Find your
AuthKeydownloaded file in your downloads folder.
Double-click to open it and you will be presented a message asking how you'd like to open it. The graphic and instructions below are for a Mac. Make sure your editor does not change any characters in your APN key; use a text-only editor like NotePad (PC) or TextEdit (Mac). Click onChoose Application...and then selectTextEditas your application to open it with.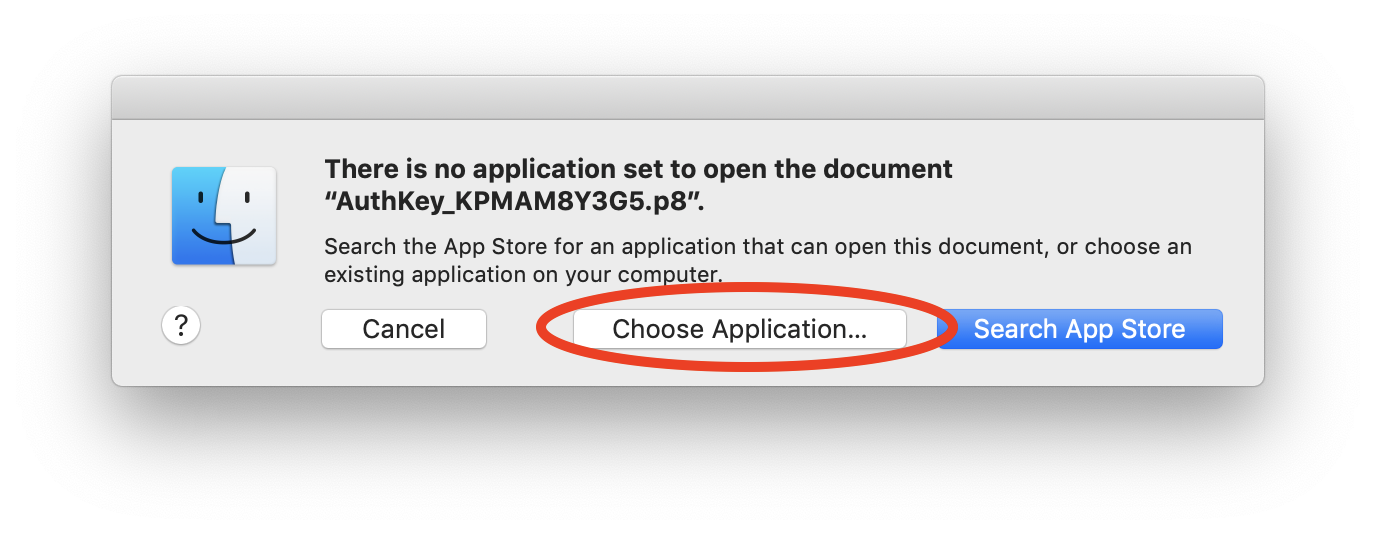
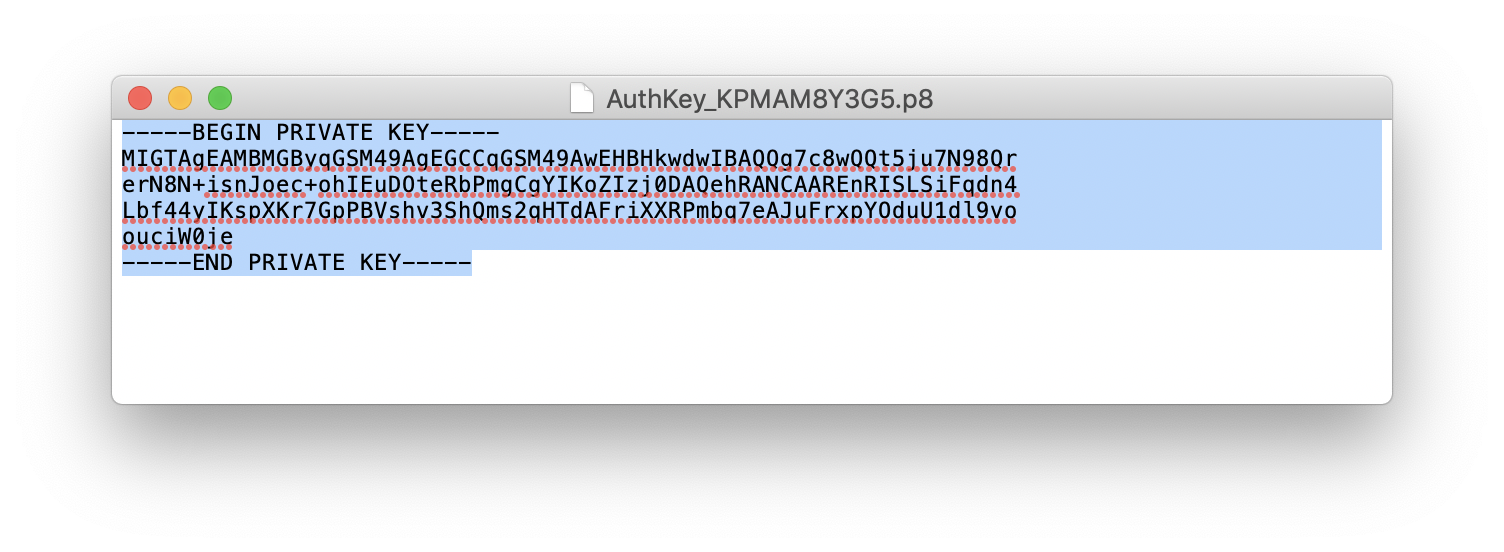
-
When the file opens, it will look similar to the screenshot below. In a few minutes, after we do a few other steps first, we will need to highlight ALL OF THE CONTENTS of that file and copy it because we will be pasting it in Heroku or whichever Nightscout provider you are using. Yes, allllll of the contents.
So, the easiest way is to:- Click inside that file
- Highlight all the text, and then
- Copy all the text to the clipboard (Cf. screenshot below).
- On a Mac, press Cmd+A to select all, then press Cmd+C to copy the selection.
- On a PC, press Ctrl+A to select all, then press Ctrl+C to copy the selection.
You don't have to do it right now...just keep that window open in the background for now until we need it a little further down. Then we will copy all that text.
Step 3: Add APN to Nightscout
Update Nightscout Site
You'll need to make sure your Nightscout site version is version 13.0.1 or newer for remote overrides and version 14.2.6 or newer for access to all the remote command features.
What is my Nightscout Version Number?
To find your Nightscout version number:
- Tap on (
☰) the hamburger button (3 horizontal lines stacked on each other) at the upper right, near the authentication button. - A context menu slides in from below the hamburger.
- Scroll to the very bottom of this menu.
- The version is located in the
Aboutsection after theSettingssection, (below theSavebutton).
This link should be used if you want to Nightscout: Update your Nightscout site.
Note for Google Cloud Users
The Nightscout with Google Cloud instructions include information about updating your site.
Scroll down to the line (on that page) that says Update Nightscout.
Add APN Variables to Nightscout
In order to use remote overrides, you must add a couple of new variables. If you don't know how to update your Nightscout configuration, review Nightscout: Setup Variables and then come back.
The instructions in this section show Heroku images. If you are using a different method, you should be able to "translate" the steps.
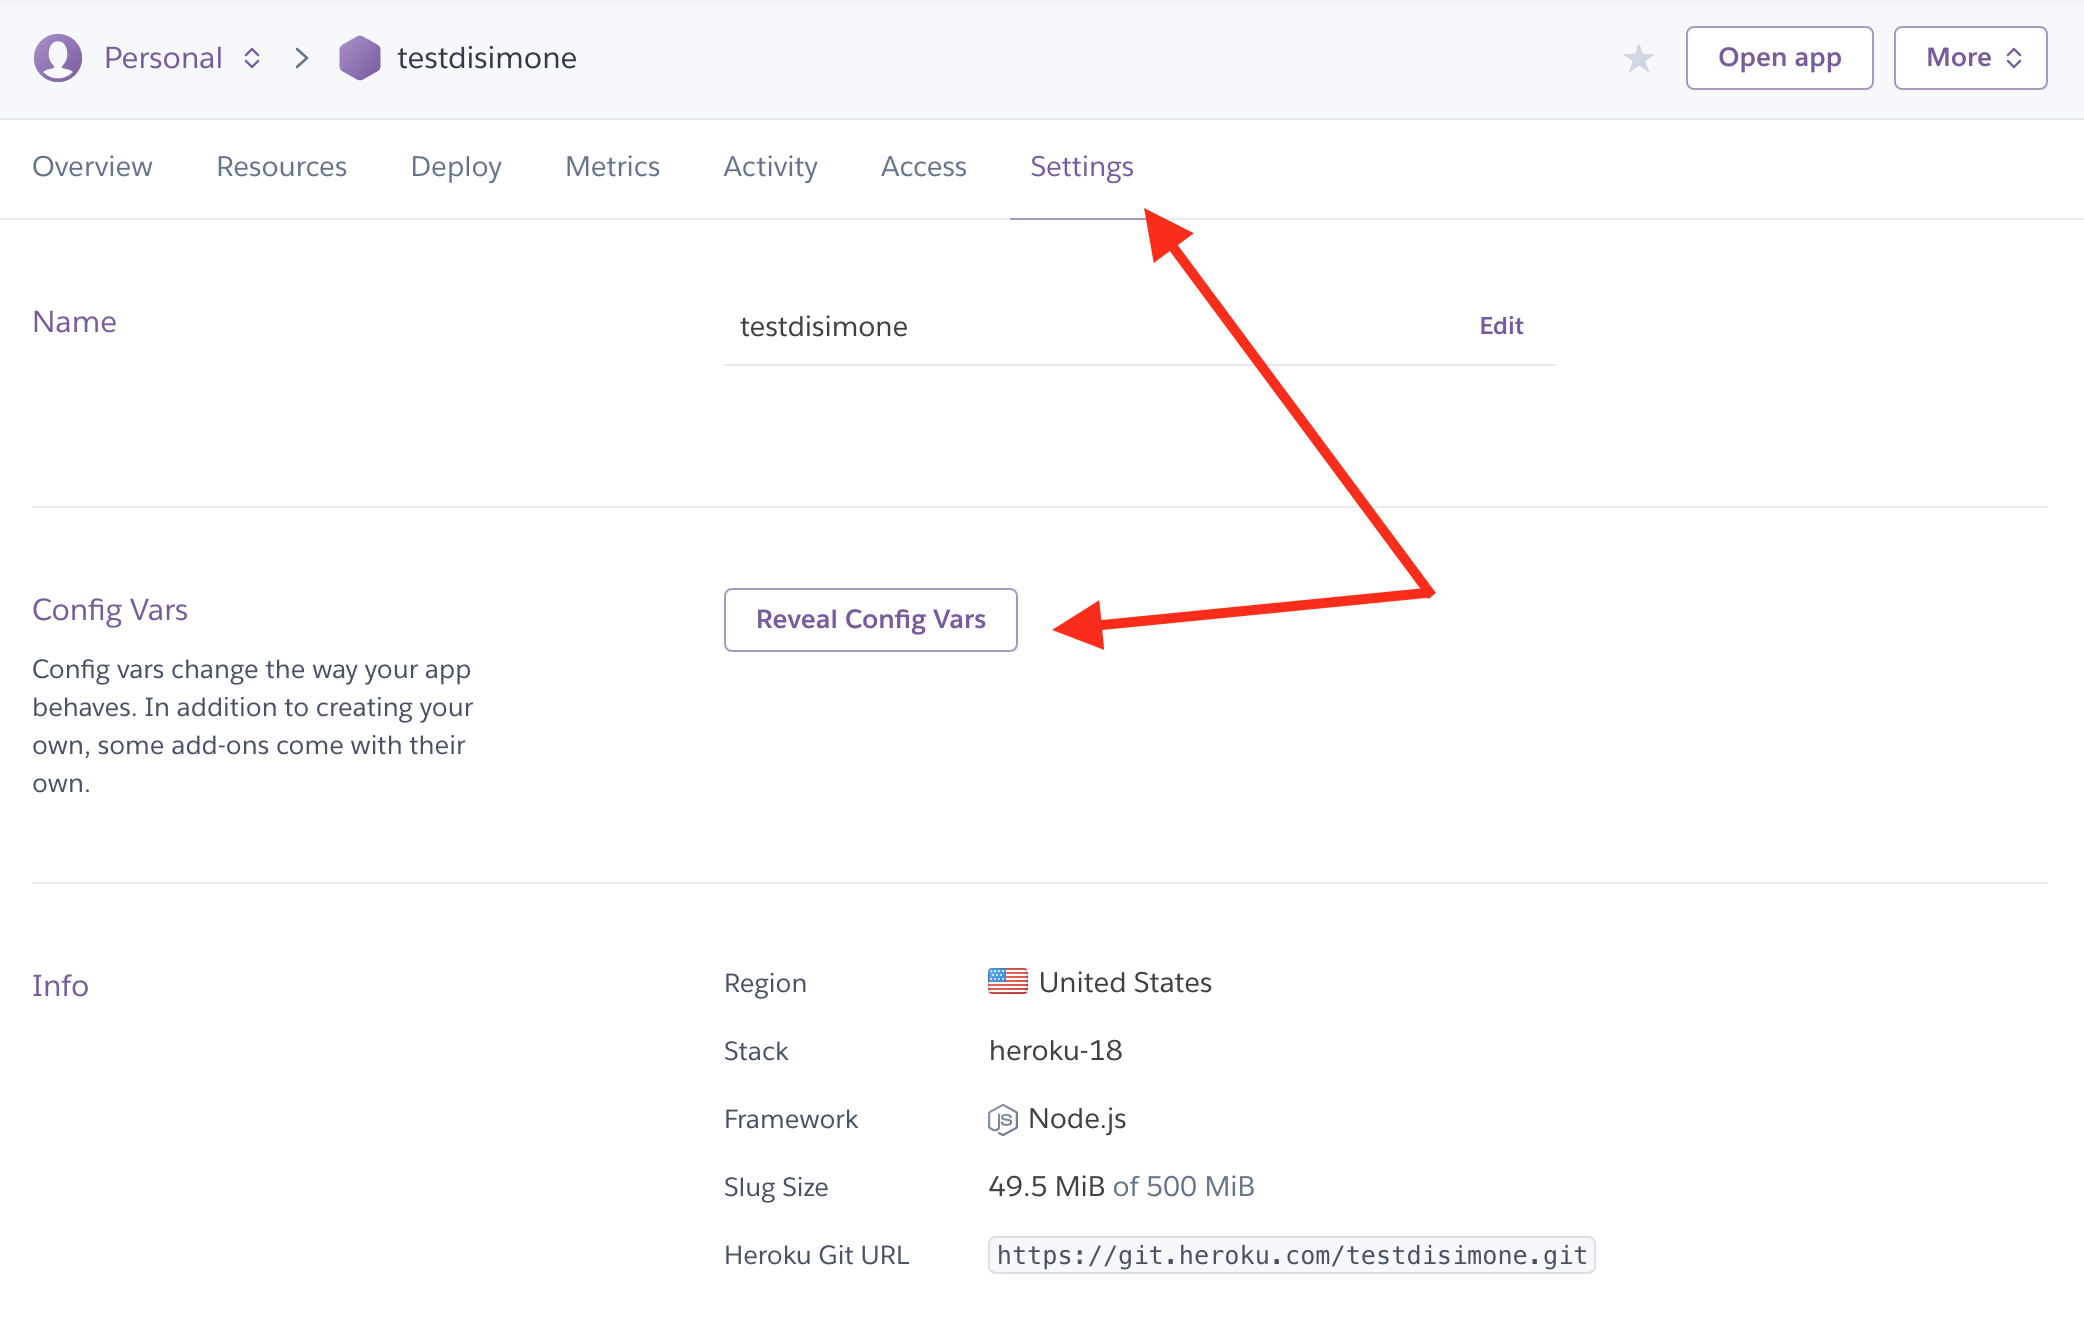
Go to the Settings tab near the top of the screen on your Heroku app and then click on Reveal Config Vars.
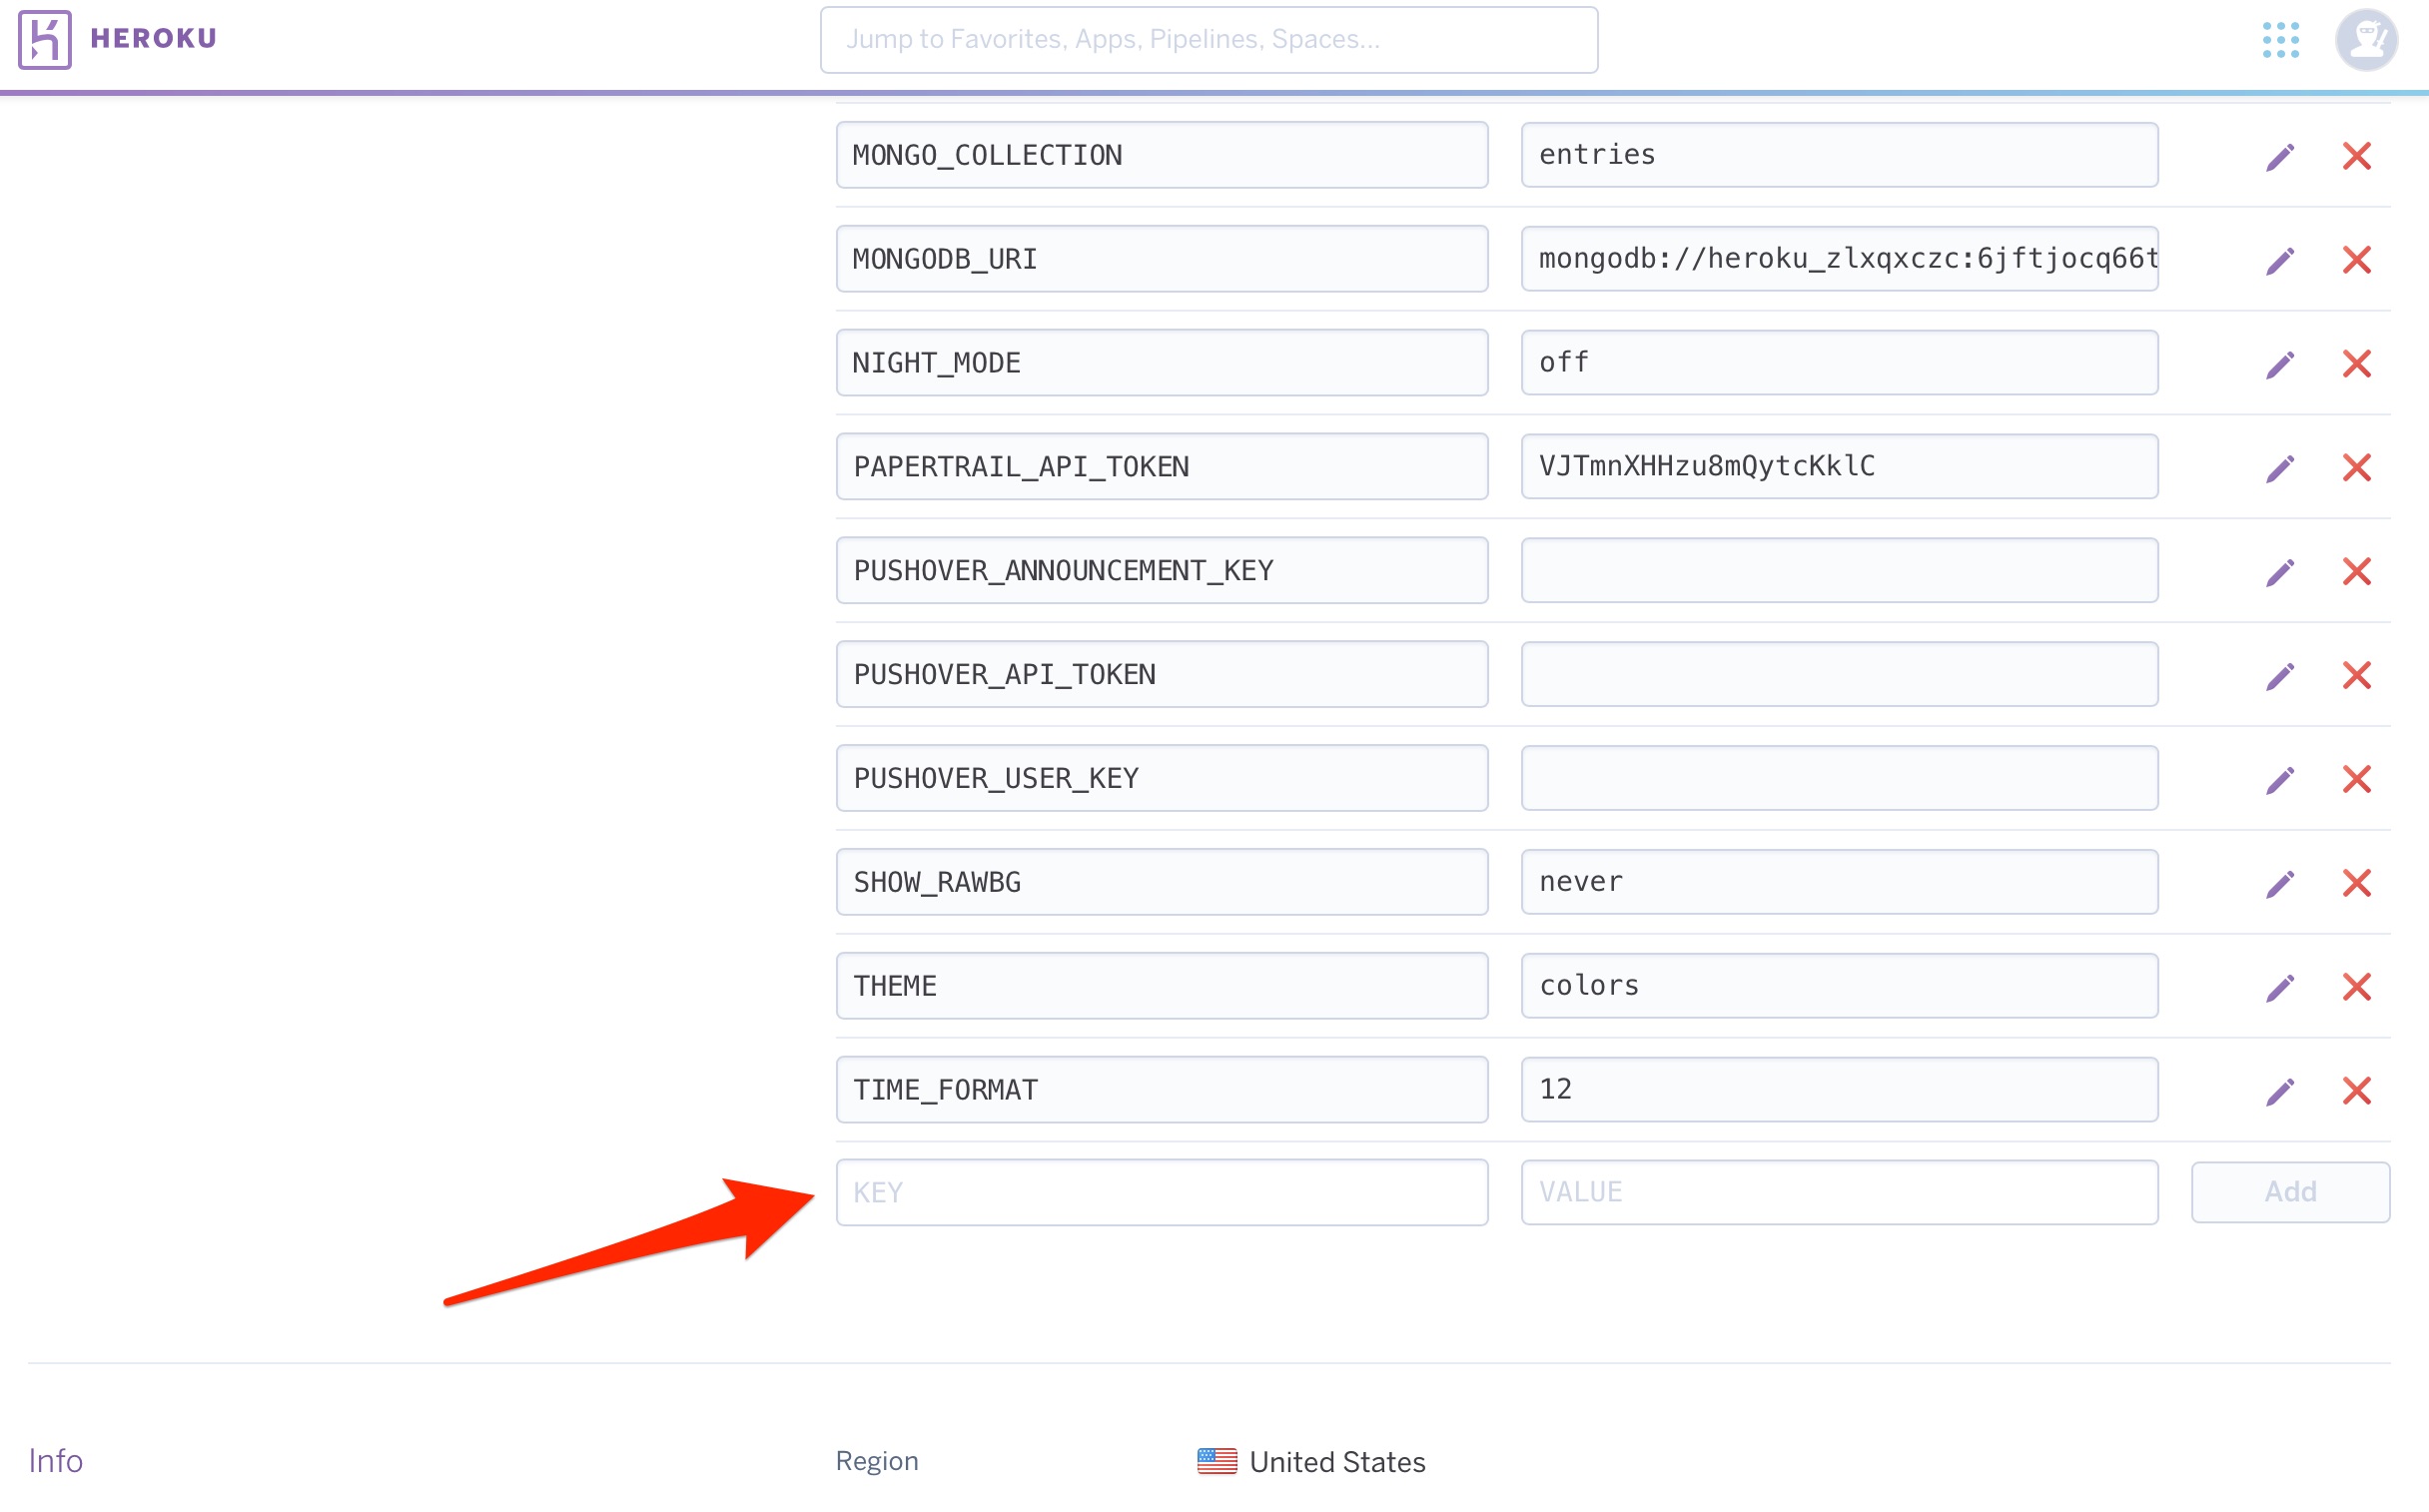
Scroll down the bottom of the Config Vars lines until you find the last blank one. You are going to add three new rows of config vars for remote overrides as shown below:
KEY |
VALUE |
|---|---|
LOOP_APNS_KEY |
Enter the ENTIRE contents of the downloaded .p8 file including the BEGIN and END lines. Here's where you can use the Cmd+A and Cmd+C to highlight and copy all the text in that file so you can paste it into Heroku here for this new variable you are creating. 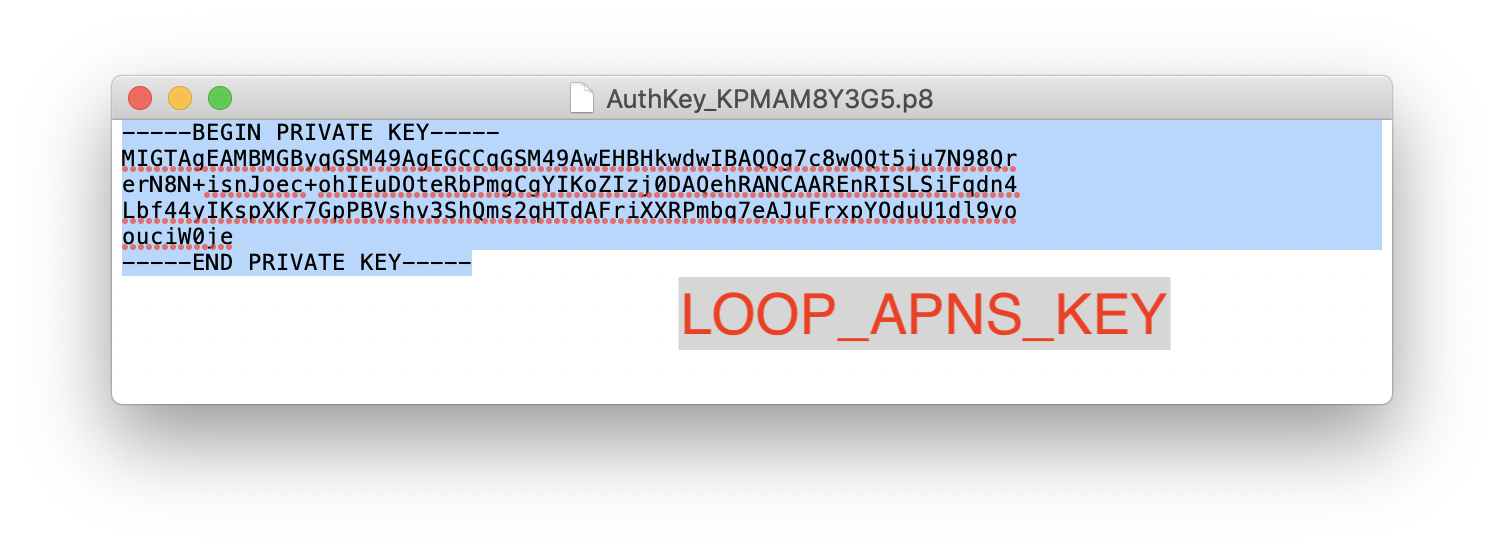 |
LOOP_APNS_KEY_ID |
String of characters on the .p8 download file immediately following the underscore (_) and not including the file extension (.p8), or you can get it from your saved key in your developer account as shown next step, too. This is a part of the downloaded filename located after the underscore (_) and before the file extension (.p8). 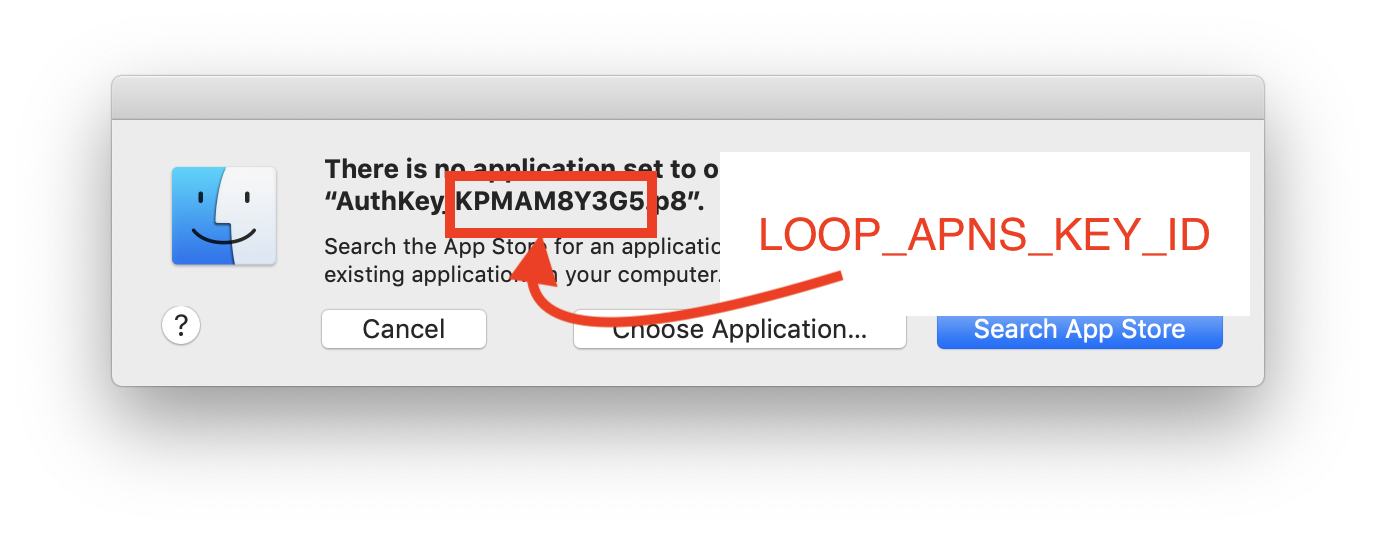 |
LOOP_DEVELOPER_TEAM_ID |
Get this value from the Loop app signing or in your Apple Developer account's top right corner under your name 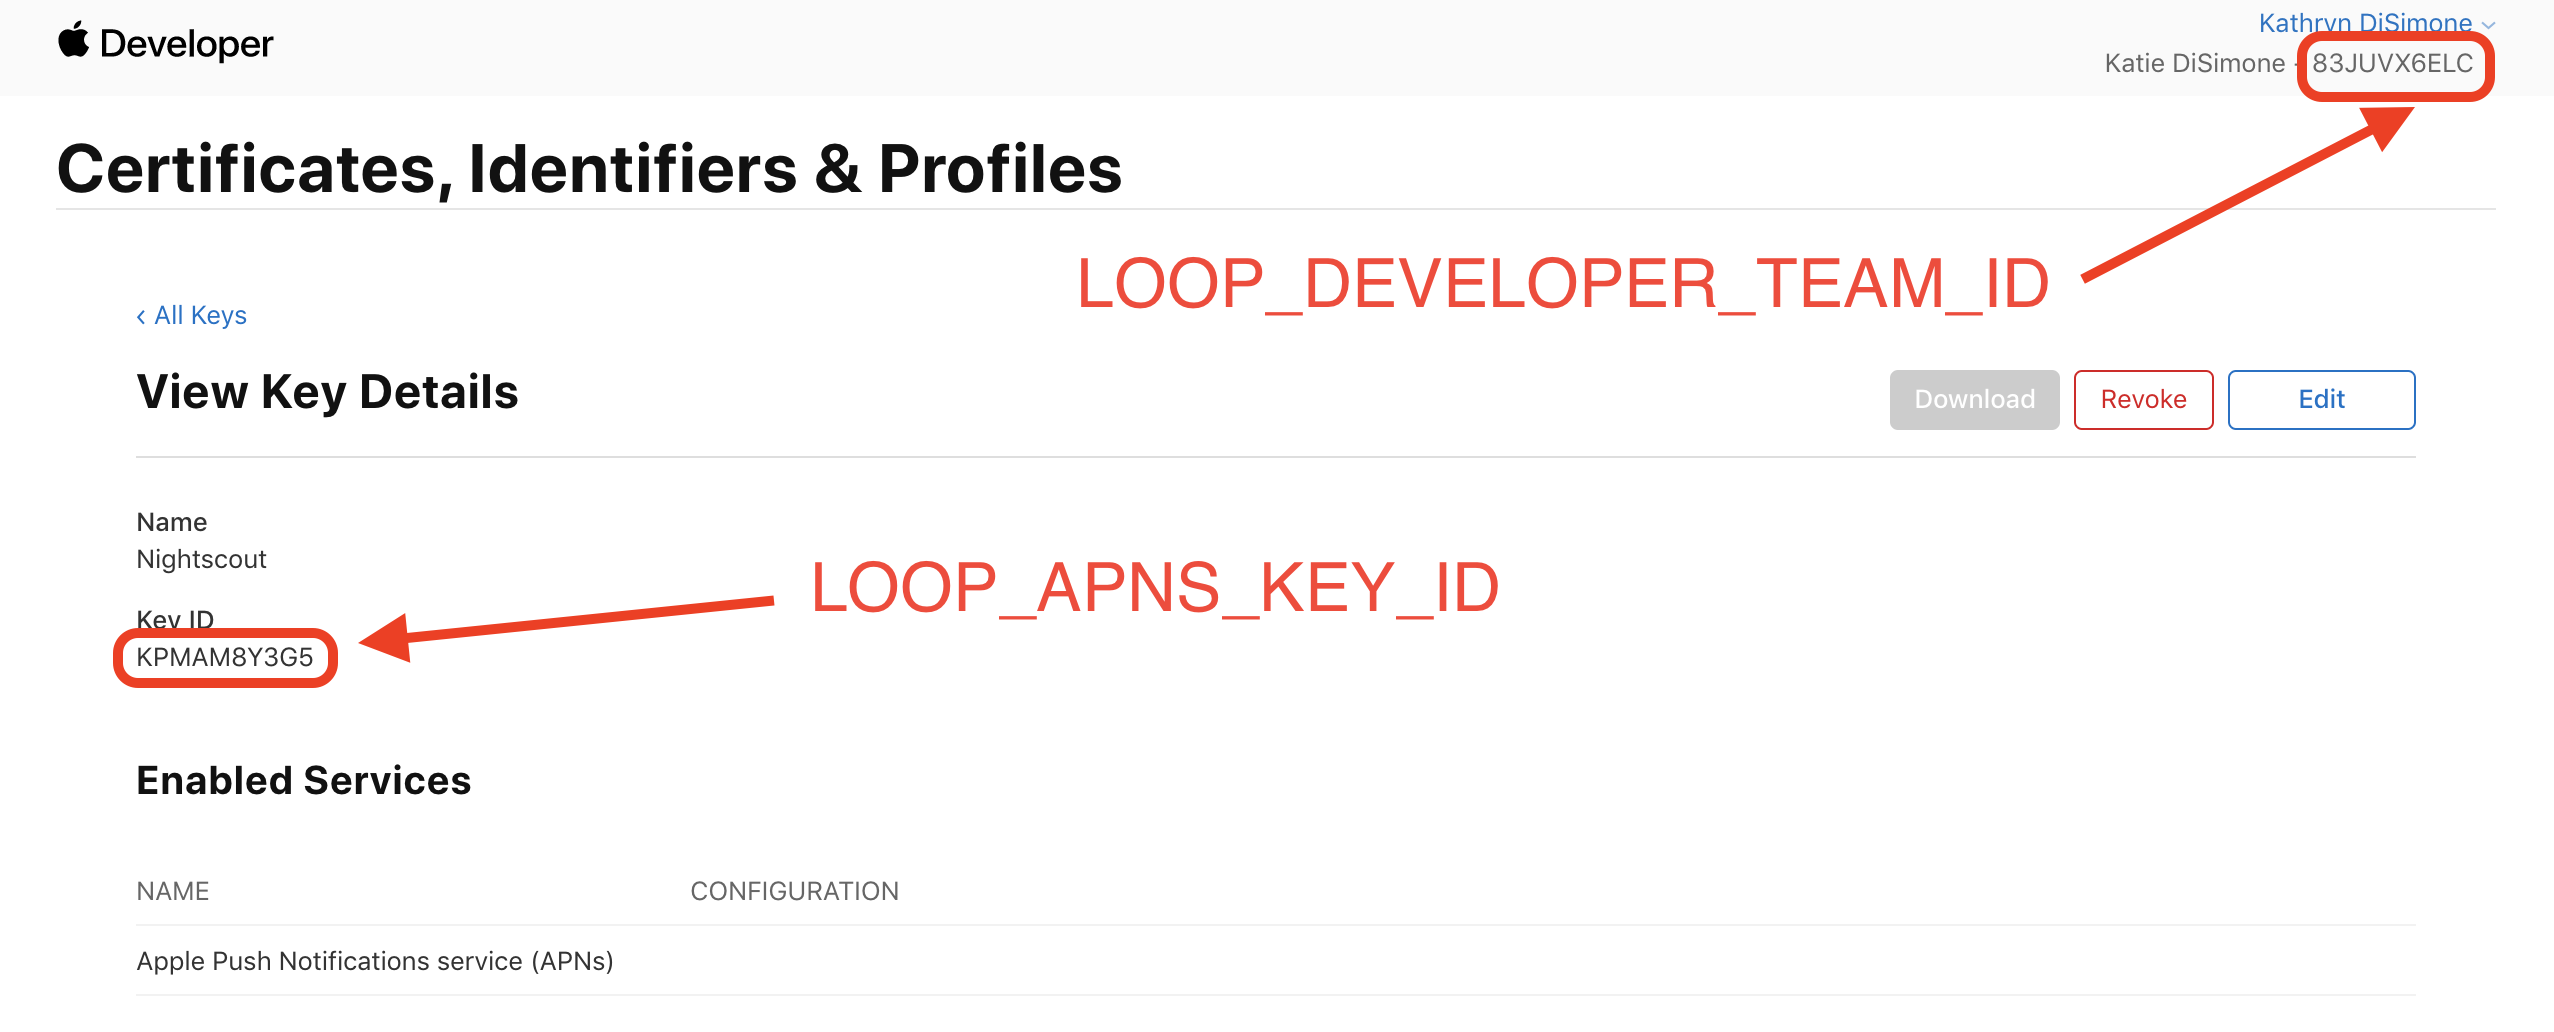 |
LOOP_PUSH_SERVER_ENVIRONMENT |
(optional) Set this to production if you installed Loop remotely such as with TestFlight, Diawi, AppCenter, or an IPA. If you built directly to your phone in XCode with your phone plugged into to your computer, do not include this variable. |
Remote Build Config Var Requirement
That last row of the table above is needed if you are using a remote build option such as LoopDocs: GitHub Build Actions or downloaded an archived file via Loop and Learn: Remote Build with Diawi. If you later return to a direct Xcode build to your phone, you must remove that config var or remote commands will not work.
When executed properly, you should have something that looks like this for the three (or four) new variables that you added:

BadDeviceToken
When the Nightscout config var LOOP_PUSH_SERVER_ENVIRONMENT does not match the Loop app build method; the error message contains the phrase APNs delivery failed: BadDeviceToken.
- If Loop was installed remotely (typically from TestFlight following GitHub Browser Build), you must have Nightscout config var
LOOP_PUSH_SERVER_ENVIRONMENTset toproduction - If Loop was built using Mac, you cannot have
LOOP_PUSH_SERVER_ENVIRONMENTas one of your Nightscout config vars
Do Not Confuse Your Keys
API Key vs APN Key
If you build with the Build with Browser, you may notice the Application Programming Interface (API) key has the same type of format as the Apple Push Notification (APN) key. The keys for both purposes are of type p8, but should not be confused.
The Secrets for building with GitHub use the API Key.
The config vars for Nightscout use the APN Key.
- If you are using remote commands with Nightscout and building with the GitHub Browser build method, you must also add the config var of
LOOP_PUSH_SERVER_ENVIRONMENTwith a value ofproductionto your Nightscout site or the remote commands will not work. - If you are using the Mac build method, you should not have a config var of
LOOP_PUSH_SERVER_ENVIRONMENTentered - remove it if it is present.
Step 4: Test Remote Overrides
If remote overrides do not function, remote commands for delivering a bolus or adding a carb entry will not work either.
After you finish setting up your Nightscout site:
- Use the Looper's phone to set an override
- Make sure that override shows up on the Nightscout site
- Then using the Nightscout Careportal, test that you can turn off that override
Things to Check:
- Remote overrides will not start working until after you activate an override in the app at least once
- Activating an override from the Loop interface will upload the necessary push notification token to Nightscout which will enable remote commands to work
- If your Looper gets a new phone - be sure to activate an override from the new phone before trying to use remote commands
- Notifications must be allowed in Loop
- Give loop access to all health data
- Enable Background App Refresh
- Double check your Nightscout credentials
- Low Power Mode may prevent background notifications from working
- Some have found that activating the “Focus” and Do-Not-Disturb features on iOS can prevent push notifications from being delivered
- Turn these off when troubleshooting to eliminate this as a source of problems
- iOS 15.3.x: Note there are reports of Remote notifications not being received to the Loopers device for iOS version 15.3 and 15.3.1; this is fixed in iOS version 15.4
- If you distribute the app remotely (i.e. TestFlight, Diawi, AppCenter), you must set a special Nightscout variable, LOOP_PUSH_SERVER_ENVIRONMENT to “production”, to enable push notifications