Features
New with Loop 3
This page discusses some features new with Loop 3.
Remote Carb / Bolus
Companion Apps for Remote Control
There are 2 ways to send remote commands:
The remote features were originally developed in coordination with the development of LoopCaregiver and updates to Nightscout were added at that time to support these remote features. Subsequent to that, LoopFollow added code to directly send Apple push notifications to the Loop app, so offers a separate path for providing remote control for caregivers.
WARNING
You will be using this feature at your own risk, like any other Loop code you build. It is very important you completely read and re-read the links listed below before getting started.
Be aware:
- Apple limits how many push notifications (used by this feature) can be received on an iOS device
- If the system feels too many are being sent, it may begin to throttle notifications
- There is no published limit, but consider limiting it to 1 or 2 per hour
- When on cellular data, there may be further limitations to protect your data usage
The Apple limits on push notifications will limit LoopFollow, LoopCaregiver and direct use of the Nightscout careportal.
Remote Control with LoopFollow
The LoopFollow app is very popular with caregivers and with people who use OS-AID for themselves because of the overview display and extensive, flexible alarm features. This can only be used on an iOS device: an iPhone, iPad or Mac. You can have copies of LoopFollow on multiple devices and share responsibility with multiple caregivers. So be careful in your usage.
Please refer to:
Remote Control with LoopCaregiver or Nightscout
Loop 3 supports Remote Carb and Remote Bolus feature to enable remote caregivers to better assist the person who needs support managing with Loop. This requires the Loop user have a Nightscout site. Please review these pages housed in LoopDocs:
Remote Control of More than One Person
You can use the same Apple push notification credentials to support more than one person.
- Each person must have their own unique Nightscout URL
- For LoopFollow, each person has their own app and you can personalize that app with their name and icon
- Refer to LoopFollowDocs: Multiple People
- For LoopCaregiver, each person is added to the same LoopCaregiver app and you switch between people in the app
Non-Pump Insulin
If insulin is taken from a different source and the user wants to let Loop know, there is a new method in Loop 3.
With Loop 2.2.x, the user manually entered the Insulin dose into the Apple Health app. Loop then imported that value.
With Loop 3, the "old" method still works, but there is a new method for entering this information. This method enables the user to indicate the type of insulin so that the appropriate model is used by Loop. An updated Glucose prediction chart is displayed prior to saving the dose.
Enter non-pump insulin before carbs
WARNING
If you are planning to enter non-pump insulin to cover carbs and you do NOT want Loop to automatically start increasing insulin based on the carb entry, enter the non-pump insulin first and then add the carbs.
To find out what Loop recommends, without actually dosing with Loop:
- Wait for a CGM entry (or fingerstick) to appear in the HUD
- Enter the carbs and continue to the bolus screen, i.e., do not save carbs
- Note the recommended bolus, but do not actually bolus
- Back up to the carb entry screen and
Cancel
- Go to the non-pump insulin screen and enter the bolus amount you've decided to take, and select the model if it's different from your pump
- Don't forget to actually take the insulin
- Add the carb entry and save the carbs without bolusing
-
Tap on either of the insulin charts (Active Insulin or Insulin Delivery) on the home screen to display the
Insulin Delivery Screen. This screen has 3 tabs.- Event History (default) lists delivery events from the Pump (does not include times when pump is returned to Scheduled Basal Rates)
- Reservoir This is the reservoir level reported by the attached pump. Pods are treated differently from other pumps because the reservoir does not begin to report until the pod has reached 50 U or below. You may see the previous pod reservoir levels following a pod change.
- Non-Pump Insulin injections can be recorded or edited here
-
Select the
Non-Pump Insulintab to bring up the graphic shown below- Tap on the + sign (green solid lines)
Log Dosescreen is displayed showing the currentGlucoseprediction- The default insulin type is that used by the pump
- To modify Insulin Type, tap on that row (red dashed lines)
- Picker wheel allows other insulin types to be selected
- Note that some insulin types, such as Afrezza are only available for non-pump insulin selection
- Tap on the
Bolusrow (blue dash-dot lines) to bring up a keyboard- The
Glucoseprediction chart updates automatically based on the value entered in the Bolus row - Tip, add 0.001 to the actual dose to make it easier to see if reviewing in Apple Health
- Once the user selects
Doneon the keyboard display, the entered value is displayed on theBolusrow, and theLog Dosebutton changes from gray to blue - Tap on
Log Doseto record orCancelto quit
- The

New with Loop 3.4.0
Additional details about the 3.4.0 release are found here: Version: Releases: 3.4.0
Algorithm Experiments
Two algorithm experiments are now available in the Loop app (version 3.4.0 or later). These are Glucose Based Partial Application and Integral Retrospective Correction. They can be viewed on the Loop Settings screen just below Therapy Settings and Usage Data Sharing as shown in the graphic below:

Glucose Based Partial Application (GBPA)
Do you want to know more? (Click to open/close)
-
Originally proposed as Loop PR 1988
-
Many people used a customization provided by CustomTypeOne LoopPatches informally called the switcher patch. It transitioned from Automatic Bolus at higher glucose values to Temp Basal Only at lower glucose values where the user had to select the threshold for the shift external to the Loop app.
- The "switcher" patch is no longer compatible
- The GBPA feature is intended to replace the functionality of that older customization and is controlled completely inside the Loop app
Glucose Based Partial Application is only used when Automatic Bolus (AB) is selected for Dosing Strategy
- This modification does not affect the recommended dose, only how quickly the recommended dose is automatically delivered
When AB is selected and GBPA is enabled, the percentage of the recommended dose delivered per Loop cycle ranges from 20% to 80% based on glucose level and user selected correction range. (Without GBPA enabled, AB uses a fixed 40% percentage regardless of glucose level.)
- Partial Application = 20% when glucose is at or below the users correction range lower value (including overrides) plus 10 mg/dL (0.6 mmol/L)
- Partial Application increases linearly from 20% to 80% up to a glucose level of 200 mg/dL (11.1 mmol/L)
- Partial Application is 80% when glucose level is above 200 mg/dL (11.1 mmol/L)
Insulin Delivery Using GBPA
Loop makes a prediction and recommends an insulin dose based on your settings and your glucose, insulin and carb history. The selected Dosing Strategy (Automatic Bolus with or without GBPA or Temp Basal Only) only changes how quickly that recommended dose is delivered.
This example assumes Loop recommends 1 U (at time 0) and future glucose values match Loop's prediction for each successive 5-minute update. In other words, over half an hour, Loop provides about 1 U of insulin above that delivered by the scheduled basal rate.
The tables below show Automatic Bolus patterns, using a pump minimum bolus increment of 0.05 U, for several application factors. When using GBPA, the application factor can vary with glucose, but that is ignored for this simplified example.
The first table shows the bolus delivered each Loop cycle for several application factors. Higher application factors start with higher boluses, but go to zero (indicated by a dash) more quickly.
Incremental Dose for several application factors when initial recommendation is 1 U
| Minutes | 20% | 40% | 60% | 80% |
|---|---|---|---|---|
| 0 | 0.20 | 0.40 | 0.60 | 0.80 |
| 5 | 0.15 | 0.25 | 0.25 | 0.15 |
| 10 | 0.15 | 0.15 | 0.10 | 0.05 |
| 15 | 0.10 | 0.10 | 0.05 | - |
| 20 | 0.10 | 0.05 | - | - |
| 25 | 0.05 | - | - | - |
| 30 | 0.05 | - | - | - |
The second table shows the cumulative delivery. A dash shows recommended dose was delivered. Remember, this is a simplified example.
Cumulative Dose for several application factors when initial recommendation is 1 U
| Minutes | 20% | 40% | 60% | 80% |
|---|---|---|---|---|
| 0 | 0.20 | 0.40 | 0.60 | 0.80 |
| 5 | 0.35 | 0.65 | 0.85 | 0.95 |
| 10 | 0.50 | 0.80 | 0.95 | 1.00 |
| 15 | 0.60 | 0.90 | 1.00 | - |
| 20 | 0.70 | 0.95 | - | - |
| 25 | 0.75 | 0.95 | - | - |
| 30 | 0.80 | 0.95 | - | - |
The 20% and 40% application factor columns did not reach 1 U in 30 minutes because the requested dose is smaller than this pump will deliver. The 60% application factor only reached 1 U because tiny doses down to 0.03 U were rounded up to 0.05 U.
When Dosing Strategy is set to Temp Basal Only , Loop provides about 17% of the recommended bolus each 5-minute interval. The minimum GBPA application factor of 20% was selected to be similar to that rate for lower glucose values. Initially, an application factor of 20% delivers insulin more quickly than Temp Basal Only, but by the end of 30 minutes, the basal program inside the pump keeps track of how much is delivered to reach the rate requested, acheiving the full 1 U (for this example).
Integral Retrospective Correction (IRC)
Do you want to know more? (Click to open/close)
- Originally proposed in Loop Issue 695
- This was tested in a few forks but not included into dev until recently
- Initial merge into the Loop app: Loop PR 2008
- Updated with a modification to limit stacking of IRC with Glucose Momentum: Loop PR 2028
The IRC term is described in this (updated) comment in Loop Issue 695 which includes plots and equations. Some of the information in that comment is repeated below: Important points about IRC.
If you want to look at the code for RC and IRC, examine these files found in LoopKit/LoopKit:
- RetrospectiveCorrection code: StandardRetrospectiveCorrection.swift
- IntegralRetrospectiveCorrection code: IntegralRetrospectiveCorrection.swift
Integral Retrospective Correction, when enabled:
- changes the Loop prediction model and thus can affect the recommended dose
- applies to Dosing Strategy of both Temp Basal Only and Automatic Bolus
Refering to the Algorithm: Prediction page:
- When IRC is disabled (default), the equation used to predict glucose continues to be:
- When IRC is enabled that equation changes to:
Note that the Momemtum term does not just add to the other effects; it is actually more complicated (and also more challenging to describe in simple math terms).
The Retrospective Correction section of the Predicted Glucose Chart is updated when IRC is enabled, as shown in the graphic below. The Integral effect, inside lower blue rectangle, is the difference between the IRC and RC calculations.

Important points about IRC:
-
Known risk factors compared to standard Loop:
- With IRC turned on, Loop will likely increase insulin corrections in response to persistent discrepancies between observed and predicted glucose motion, which may increase the risks of hypoglycemia
- IRC may also lead to increased oscillations ("roller-coaster") in glucose responses
- Both of these risk factors are higher if the user's setting value for Insulin Sensitivity (ISF) is too low
- Increasing ISF setting value tends to mitigate these risks but it is impossible to offer any guarantees for anything around T1D
-
Compared to standard RC, IRC is more likely to improve glucose control in the following scenarios:
- Glucose remaining high or decreasing slower than expected due to temporarily reduced insulin sensitivity or due to poor site absorption
- Glucose trending low faster than expected due to temporarily higher insulin sensitivity
- Glucose spikes due to unannounced meals
- Glucose remaining high (or trending low) on tail ends of meals where carbs entered were underestimated (or overestimated)
- Glucose remaining elevated due to unannounced protein+fat effects
- Glucose staying above (or below) the correction range due to too low (or too high) basal rate settings
-
In some scenarios IRC does not differ from standard Loop RC
- Regardless of the current glucose level, neither RC nor IRC is adding to the glucose forecast during the times when the absorption rate of announced carbs is greater than the minimum absorption rate.
- Neither RC nor IRC effects depend on glucose level; both depend on discrepancies between predicted and actual glucose responses.
-
Please do not expect immediate or very substantial improvements in blood glucose control. A one-time success after turning IRC on does not really mean that IRC "works" - this could just as well be a temporal coincidence. Some ways to decide if IRC could be safe and effective for you include:
- Responses to unannounced meals - spikes should in general be somewhat lower than with standard Loop, but there should also be no follow-up lows
- Nighttime responses over a few weeks - highs or lows should be less frequent compared to standard Loop; at the wake-up time blood glucose should in general be closer to the correction range.
Favorite Foods
This feature allows you to save Favorite Foods.
A new row on the Loop app Settings screen, see graphic below, provides access to create and edit your Favorite Foods.

In the example meal entry shown below:
- The Favorite Food row (at the bottom) is tapped
- The desired Favorite Food is selected
At this point the meal can be saved by tapping the Continue button, or the user can modify the time (typical) or any other of the carb entry rows before tapping Continue.

Note that to create a Favorite Food on the Carb Entry screen, an icon must be selected by typing on the plate icon and choosing one of the specific food emoji icons. The standard Lollipop, Taco, Pizza icons can be selected at that level, but choosing them at the top level is not sufficient to enable the Save as Favorite button. The favorite food examples seen in the graphic above were created in the Favorite Foods Settings row. The taco was chosen to go with the absorption time chosen.
New with Loop v3.10.0
Additional details about the 3.10.0 release are found here: Version: Releases: 3.10.0.
Live Activity
Live Activity was added to Loop with Loop PR 2919 in a development branch and released with version 3.10.0.
Customization Users; Browser Builders
Many people have been using Live Activity as a customization. If you used the customization - you need to remove live_activity from your customization list in your build_loop.yml file of your fork or your build will fail.
Requirements for Live Activity
- The dynamic island is only available for iPhone versions 14 pro and newer; but Live Activity on the Lock Screen is supported for older phones running iOS 16 or newer
- iOS 18 and watchOS 10 or newer are required for Live Activity to appear in the Smart Stack on the Apple Watch
-
iOS 26 or newer is required to have Live Activity appear in the CarPlay view
Dynamic Island
If your phone supports Dynamic Island and you enable Live Activity, then Dynamic Island is displayed.
There is no separate control to enable one without the other.
Enable Live Activity
- The configuration for the Loop Live Activity widget on the lock screen is found under Loop, Settings, Notifications, Live Activity
- Live Activity will be displayed when enabled here and on the iPhone itself
- You must also enable Live Activity under iPhone settings, Loop, tap on Live Activites and enable both Allow Live Activites and More Frequent Update

After you enable Live Activity, lock your screen.
- If you don't see the Live Activity, you may need to quit and restart the Loop App
- Sometimes after a reboot, you may need open the Loop app before Live Activity for Loop shows up
- You might need to disable and then enable Live Activity
Configure Live Activity
To configure what is shown on your Lock Screen, and CarPlay when supported:
- You can select Large (with a plot) or Small
Mode - You can enable or disable the predictive line display (when Large is selected)
- You can modify the values of glucose to indicate high or low levels
- You can choose to show glucose with a single color (Loop blue) or using different colors for different levels
- You can configure details displayed in the widget by tapping on the
Bottom row configuration(indicated by the blue rectangle in the graphic above)
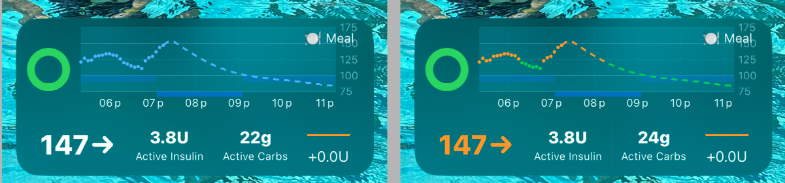
Effect of Use BG coloring
Use BG coloring is disabled for the graphic on the left and enabled for the one on the right.
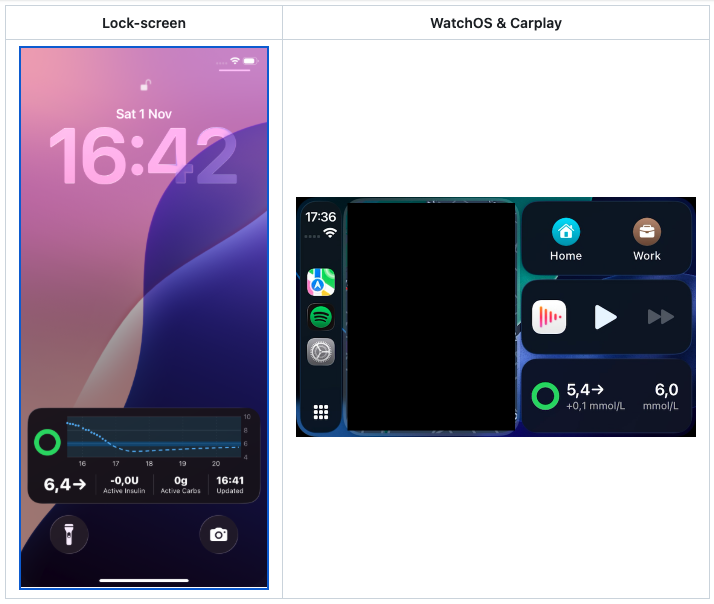
Example Lock and Watch / CarPlay Displays
Example screens are shown below.
Widget Layout using Bottom row configuration
You can configure the details displayed in the Lock Screen widget by tapping on the Bottom row configuration in the Loop Live Activity settings screen.

Only 4 items can be displayed at one time. If you want a different set of items, make sure 3 or fewer are selected.
-
Left side of graphic above:
- Tap on a minus sign (highlighted with red rectangle) to remove an item
- Drag items up or down using (highlighted with a blue rectangle).
- Tap on the plus sign (highlighted with blue rectangle) to display right side of graphic (only active when 3 or fewer items are selected)
-
Right side of graphic above:
- This display shows all available options with no indication which ones are selected
- If you touch an item it is added to your selection
- When your selection reaches 4 items you are automatically returned to the previous screen
- If you want fewer than 4 items, tap on any of the control icons on this screen to return to the previous screen